Generate document from a template via Power Automate

In this article I will walk you through on how to generate document from template via Power Automate. We will create Power Apps application, Power Automate cloud flow, SharePoint datasource and Word template to make it all work. We will pass information from Power Apps form to Power Automate cloud flow and finally generate PDF file that can be used later on. It’s gonna be fun 🙂

The best part of this article is that I will walk you through every step so you know how to accomplish that goal in your work. You can also make use of this scenario in your own projects.

Case study

Let’s say we own a hotel. Hotel is named Power Universe Hotel and every person who wants to stay in this hotel must complete a registration form. In this form we will have couple of fields like Name, Surname or Phone Number. But the problem is that for our manager, these information stored digitally is not enough. He wants to have a document which includes all information about the hotel guest but also is signed by a hotel guest to confirm his reservation and the data. Finally this document must be signed by a shift manager. So everything stays in place.

In this article we will take care of getting the information from a quest and putting them on a template. The rest, like printing or signing will not be part of this article.

Creating a Word template

Before we start with the whole process, we have to think what fields we will be using and what we want to accomplish.

First we want to have fields like:

  1. Registration number

  2. Name

  3. Surname

  4. Date of birth

  5. Place of birth

  6. Address

  7. Email address

  8. Phone number

  9. Date of issue

  10. Place of issue

I know that we don’t have all required fields (I don’t own a hotel in real life xD) but let’s assume these are the fields we must get.

I created Word template that looks like this:

How to create Word template?

To create Word template you must go to MS Word and create blank document that you will be working with. Then go to “File”:

Then click “Options” at the bottom of the screen:

And navigate to Customize Ribbon tab, like I did. There find “Developer” tab and mark checkbox:

After that, click “OK” button:

After all these actions on the top of the screen you should see “Developer” tab that will help you create content controls that you can use for your form:

To add a control just click on a control (for example second “Aa”) and it will create a field for you in a document so you can pass random single line of text value through this control. I used this control for all of my fields because Power Automate does not support for example date and time fields – we use only plain text control:

If all of this works, you should be able to see a little rectangle around your field in a document, like this. This means that this control will be later available to enter here some value from our Power App:

While preparing a template you can create as many fields as you need. At the end document must be saved and uploaded into some online repository for Power Automate cloud flow to reach it. So, after I set up all of my fields I uploaded this document into my SharePoint documents library:

Creating Power Apps Canvas App

In this section I will walk you through on how to create Power Apps Canvas App to get the data about the hotel quest so we can later use them in a Power Automate flow.

At first, we must know the purpose of this application and we must know what Client wants from us. In Understand Delegation In Power Apps I was discussing how important this step is. You can go there and check “Think – don’t always do what Clients want” paragraph.

After we confirmed requirements, we know that manager wants to have an application that will be storing all required information in a datasource so later we can work with them. Our manager wants to create more processes in the future. We also want to pass all information about the current record to Power Automate cloud flow, so later we can work with the data – use it in a document generation process.

To store all required information I created a form that holds 9 fields. Registration number is generated automatically when receptionist signs up the information. So, 9 fields and one button to finish the transaction. Filled form looks like this:

As you can see we are ready to use this form, so let’s see how we patch the information into our datasource:

				
					Set(
    RegistrationNumber,
    RandBetween(
        1,
        9999999999
    )
);
Patch(
    'Hotel Registration',
    {
        Name: TextInput1.Text,
        Surname: TextInput1_2.Text,
        'Date of birth': DatePicker1.SelectedDate,
        'Place of birth': TextInput1_3.Text,
        Address: TextInput1_1.Text,
        'Email address': TextInput1_4.Text,
        'Phone number': TextInput1_6.Text,
        'Date of issue': DatePicker1_1.SelectedDate,
        'Place of issue': TextInput1_5.Text,
        'Registration number': RegistrationNumber
    }
);
ClearCollect(
    RegistrationInformation,
    {
        Name: TextInput1.Text,
        Surname: TextInput1_2.Text,
        'Date of birth': DatePicker1.SelectedDate,
        'Place of birth': TextInput1_3.Text,
        Address: TextInput1_1.Text,
        'Email address': TextInput1_4.Text,
        'Phone number': TextInput1_6.Text,
        'Date of issue': DatePicker1_1.SelectedDate,
        'Place of issue': TextInput1_5.Text,
        'Registration number': RegistrationNumber
    }
);
GeneratePDF.Run(
    JSON(
        RegistrationInformation,
        JSONFormat.IgnoreBinaryData
    )
);


So, let’s analyze what we have here:

  1. At the top of the code we have RegistrationNumber variable that stores information about Registration Number – it can be used as ID of registration form. I included that here to have some sort of ID for a record. We could do better of course but for this example it is enough 🙂
  2. Then we have Patch function that allows us to store information about current record in SharePoint list.
  3. Finally, we create a Collection with one record to store information about current record – it will be later used to pass the information to Power Automate cloud flow as JSON file.
  4. At the bottom of the screen we have something like GeneratePDF.Run(…). It is a trigger that calls cloud flow that has been created from current Power Apps application and passes one argument – JSON. JSON stores current record and is later used in populating Word template.
 

I didn’t include here some other functions like validation or updating a record because the point of this article is to generate a document from a template, not to work with validation 🙂

How to create Power Automate flow?

We will create Power Automate flow from Power Apps Canvas App.

Just go to “Action” tab and then click “Power Automate”:

Then, on the right click “Create a new flow”.

Then, on the right click “Create a new flow”.

After that, a new window should appear. Sign in to your Power Automate account if you logged of and start building your Power Automate flow using first template:

Right after, that we must get the information about the record. As I said previously we create a JSON and send it to Power Automate. So we must get this JSON and parse it to start working with a document.

To do so, choose “Compose” function, rename it to “RegistrationData” and for the content choose “Ask in Power Apps”:

Finally, you should end up with something like this:

Now, we have to test it. We have to get some information in that compose to create “Parse JSON” action, because without sample data we will not be able to finish it. It is very important. If you have “Parse JSON” action and you want to provide “Schema” for this action you must take it from called “Compose”.

So, let’s create a record in our application and see what we got.

I filled form with information I showed you previously and now I am looking for Power Automate flow runs history to check the outcome of a call.

As you can see our test run ended up with a success, so, let’s click on that record and get the “Output” of “Compose” action.

Now, we must edit our flow and create “Parse JSON” action to get parameters from Power Apps application form:

After that, use “Outputs” from “RegistrationData” function in “Parse Registration Data” function.

For “Schema” we will generate it from a sample. That’s why we copied output from our “Compose” function. All we have to do is click on “Generate from sample” and paste output there. Then click “Done”.

After that your “Schema” will be ready. So as your whole “Parse JSON” function.

Now, we have to save and run this flow to see if everything works. My result is presented below:

As you can see at the bottom in “OUTPUTS” section of “Parse JSON” action we have our parameters ready to use.

Avoiding loops

If you will leave the flow like this at this step, you will be dealing with loops that will be created for generating a document. We must avoid those loops if possible, so we will add one more “Parse JSON” action, but this time we will use First( ) function and modify “Schema” to match our needs.

Sample of a loop is presented below:

At first, add another “Parse JSON’ action and in “Content” field use First( ) function with parameter of previous “Parse JSON” body.

				
					first(body('Parse_Registration_Data'))


As for “Schema” section go to your flow’s history and click your previous run – when we tested flow. Then, open “Parse Registration Data” action and click “Show raw outputs”.

Then, copy raw output.

To properly configure schema for this “Parse JSON” action click “Generate from sample” and paste copied code.

We are not done here. To make it work properly you must cut a part of a code that is highlighted below:

By doing this, we create an object with parameters. Your code should look like presented below. Please remember about deleting closing brackets as well.

				
					{
    "type": "object",
    "properties": {
        "Address": {
            "type": "string"
        },
        "Date of birth": {
            "type": "string"
        },
        "Date of issue": {
            "type": "string"
        },
        "Email address": {
            "type": "string"
        },
        "Name": {
            "type": "string"
        },
        "Phone number": {
            "type": "string"
        },
        "Place of birth": {
            "type": "string"
        },
        "Place of issue": {
            "type": "string"
        },
        "Registration number": {
            "type": "integer"
        },
        "Surname": {
            "type": "string"
        }
    },
    "required": [
        "Address",
        "Date of birth",
        "Date of issue",
        "Email address",
        "Name",
        "Phone number",
        "Place of birth",
        "Place of issue",
        "Registration number",
        "Surname"
    ]
}


Now, everything should work properly so don’t worry about loops anymore. Of course, if you want to do more that just one document in a single flow you should leave this loop so more documents can be processed.

After that, we can move to generating Word document from a template step.

Creating Word document from a template in Power Automate

Do you remember where you uploaded your Word template? I remember where I uploaded mine. Now, we must use it to generate Word document from it.

To do this go to Power Automate flow and add new action called “Populate a Microsoft Word template”. Then, search for your template. If everything works well you should see all of your template’s fields that you have created. Like I see mine:

!! Please note that in order to use this action you must have premium license for Power Automate which can be acquired by starting your Power Apps trial or purchasing some other Power Automate or Power Apps license like Power Apps per User plan.

Finally I got my action configured as follows:

You can see that fields: [place_of_issue] and [date_of_issue] are duplicated. It is because they are used at the top of the template one more time.

Now we must fill the information about fields content:

To test it all we must add an action to create file. I chose to create a file in SharePoint Shared Documents library.

To do this just add an action “Create file” and configure it as I did. Title of a file can be whatever you want. Just add “.docx” at the end.

My action looks like this:

Final Word document looks like this:

As you can see this document is already perfect 🙂 And everything works fine!

Avoiding errors

I want to tell you about one common error that showed up even when I was creating this solution 🙂

This error’s message I am pasting below:

Request to Azure Resource Manager failed with error: '{"error":{"code":"InvokerConnectionOverrideFailed", "message":"Could not find any valid connection for connection reference name 'shared_wordonlinebusiness_1' in APIM tokens header."}}'.

This error is connected to the fact that you created an Word action and didn’t configure proper connection with Power Apps.

To resolve this issue you must reset the connection to your Power Automate flow in Power Apps Canvas App. Remove current call to Power Automate and add it one more time.

In my example I removed whole part that is highlighted below:

				
					GeneratePDF.Run(
    JSON(
        RegistrationInformation,
        JSONFormat.IgnoreBinaryData
    )
)


Then added it back again, but from Power Automate tab. This is very important step. Just remember to copy a formula from this button somewhere else because it’s gonna be deleted once you add new Power Automate Run( ) function.

I have a little tip for you in this place. If you want to avoid all this problems with disappearing lines of code you can create another button and replace the Run( ) execution there. This action will be populated to other calls and other buttons in your Power App. So you will not need to copy/paste the code every time you change something. Just make this change in different button 🙂

Create PDF document

To create PDF file we have to add two more actions. One called “Convert Word Document to PDF” and another “Create file”. So, at first we convert our Word document then we create this file in our repository.

In my example these actions are configured as follows:

Finally, we can test our flow. It should look like this:

Before testing remove previously created documents. If you will not remove files you will get “Bad request” error – of course if the files names are the same.

Final PDF file looks like this:

I think it looks pretty nice 🙂 We did it! We have PDF file created using Power Apps form, Power Automate flow and a Word template!

Summary

It was long way down here. I picked up some mountains view to mitigate a headache that you probably experienced, haha 🙂

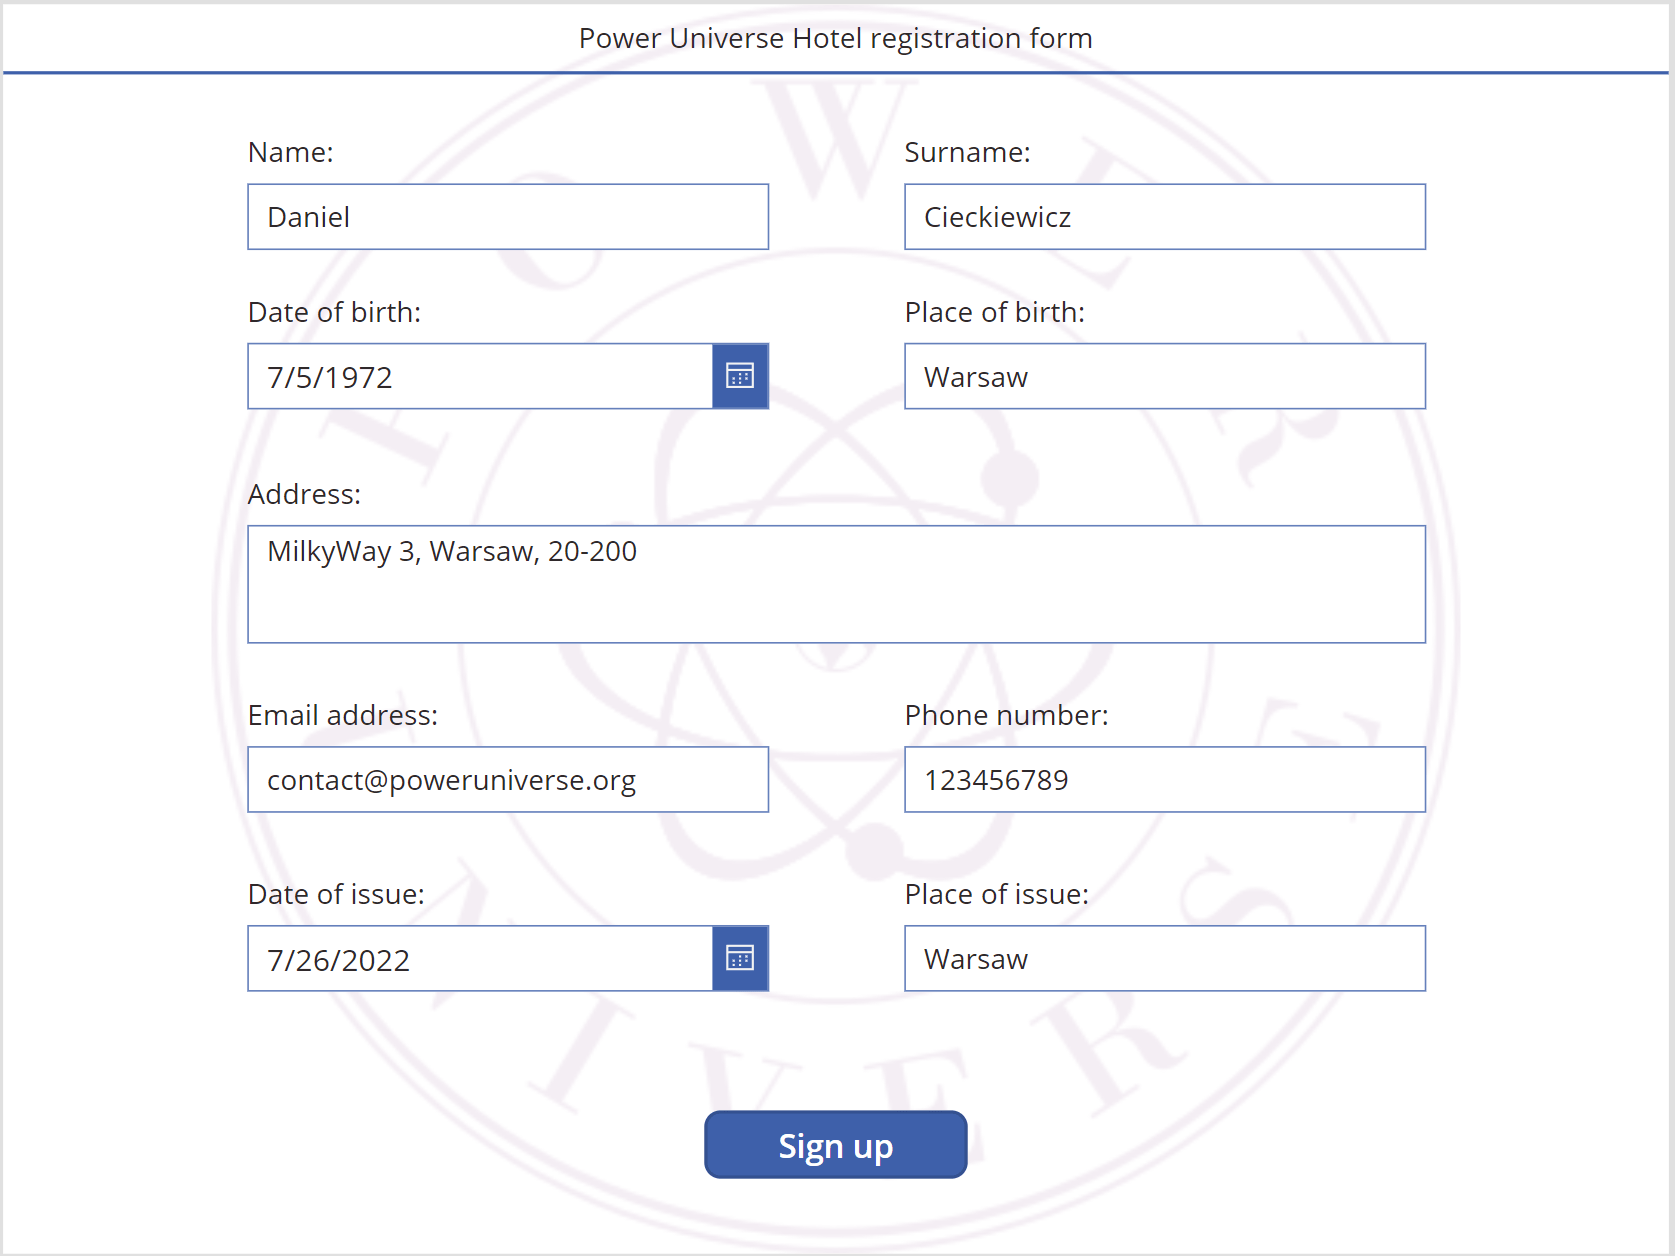
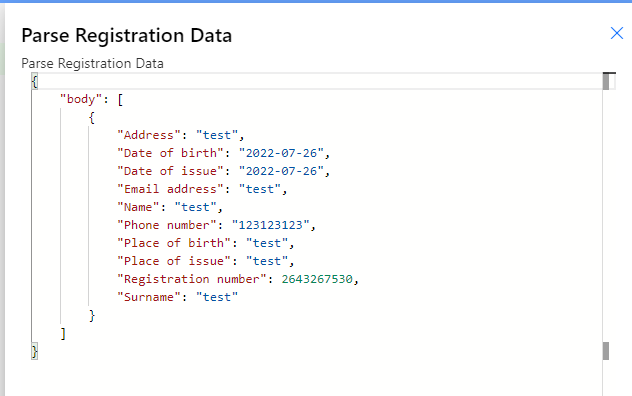
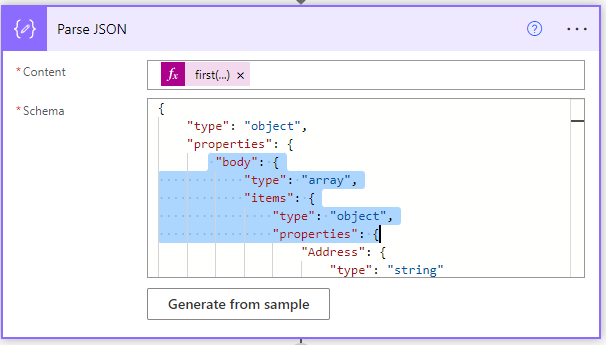
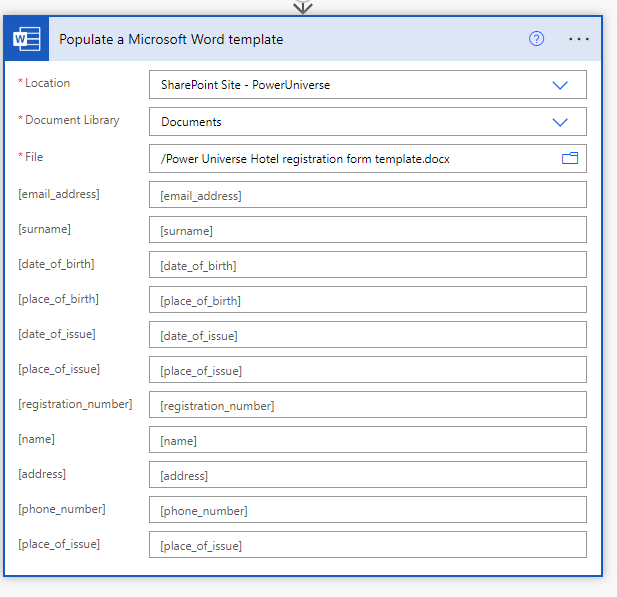
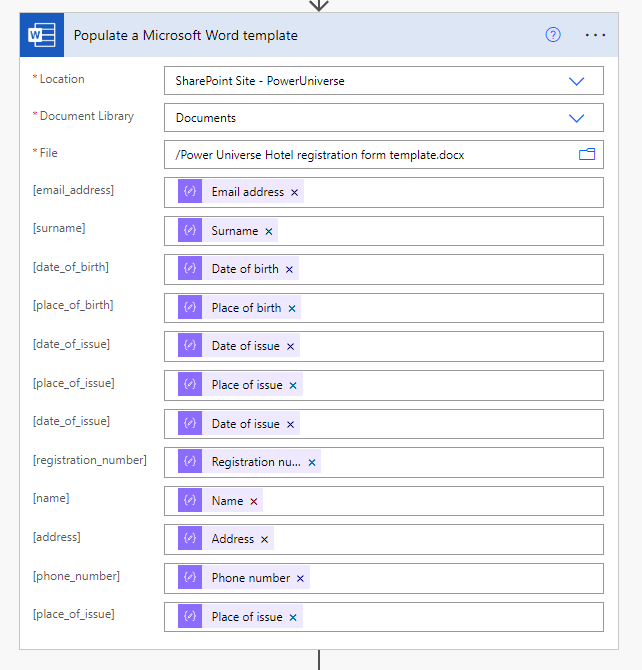
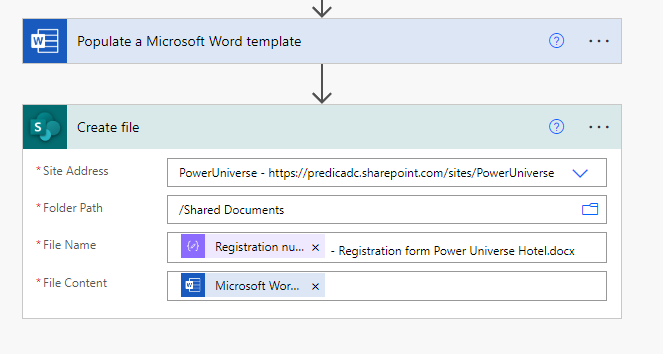
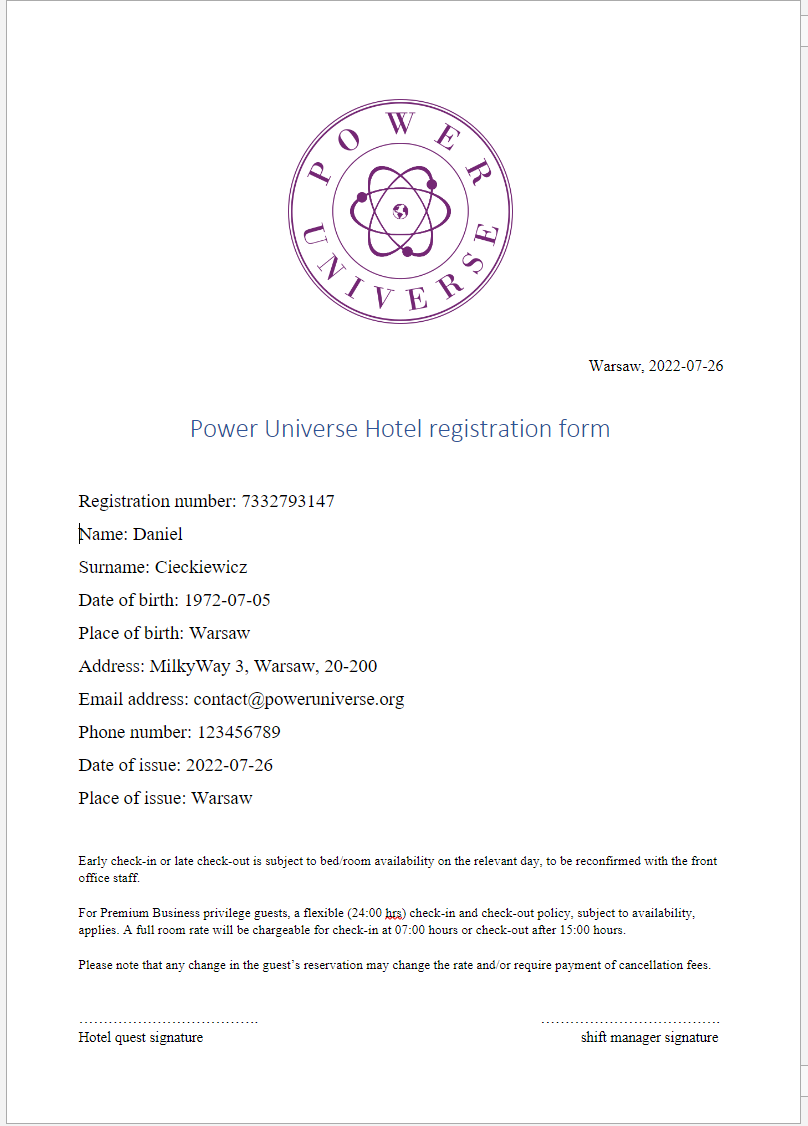
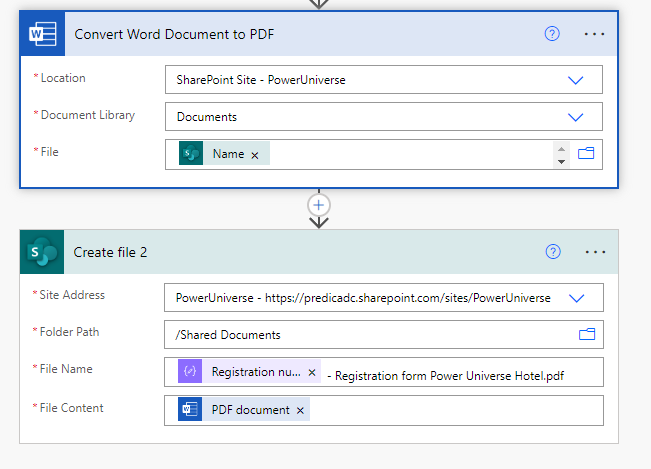
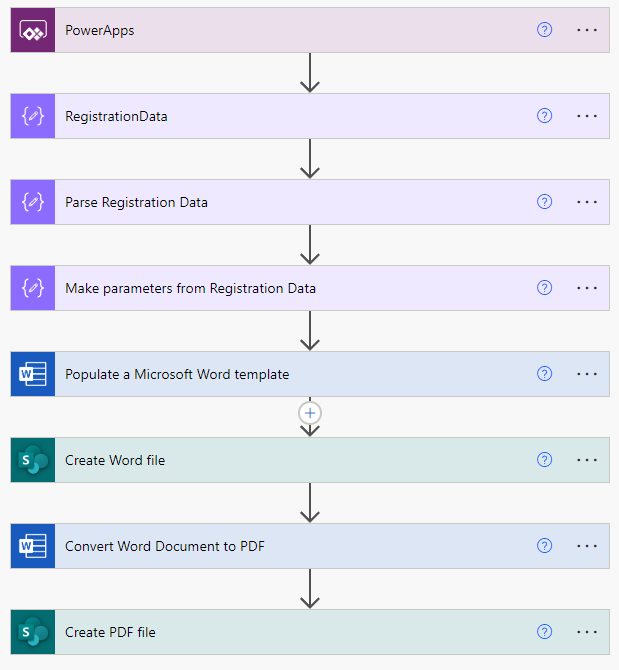
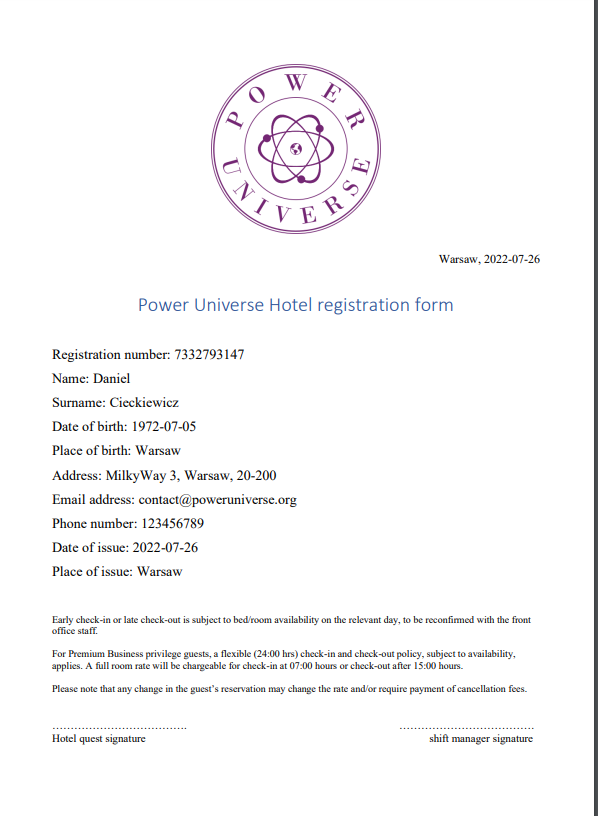
If you ended up here that must mean you one – read whole article, or two – you just scrolled down here. Anyway, thank you for your time and for scrolling through this article. This example is not very complex and as you can see you can pretty easily create Word and PDF files using Power Automate and Power Apps. There is no custom code required, no additional development. What I showed here is all you need to know to accomplish this goal of having PDF file generated from a template.

Thank you for your time, and for reading this article. Feel free to rate this article down here and comment if you liked it. If you have any questions feel free to contact me (via contact@poweruniverse.org), but first, you may be interested in joining a Newsletter? Hmm? (Sign up hereIf you already did, woow, thanks, thanks a lot 🙂 

Via Newsletter I am sharing with you insights of my work, plans for upcoming weeks and knowledge about Power Platform Universe and IT world 🙂 If you are interested feel free to join! To every person who joins I am going to send latest Newsletter as well!

See ya!

About the author

Daniel Ciećkiewicz

FOUNDER

I am a Senior Power Platform Consultant focused on Power Apps and Power Automate. I also worked as a Team Leader with responsibilities for every Team Member and their development paths. 

In my private life I like video games, sport, gaining knowledge and a taste of good Scotch Whisky! 

Oh, I almost forgot, I love our Polish Tatra Mountains!

5 1 vote
Article Rating
Subscribe
Notify of
guest

2 Comments
Oldest
Newest Most Voted
Inline Feedbacks
View all comments
Ewa
Ewa
1 year ago

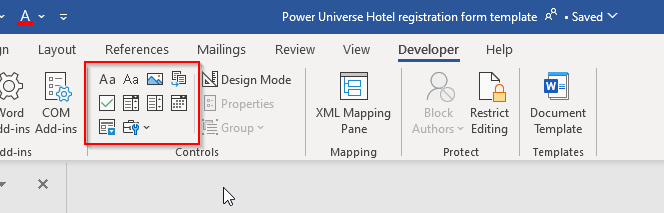
Hi, do you know how to create a checkbox in Word template? I know that there is such option, but it doesn’t work.

2
0
Would love your thoughts, please comment.x
()
x