Create and use Dataflows in Power Apps
Daniel Cieckiewicz
Dataflows – very powerful tool for bringing the data from external data sources into Dataverse or Azure Data Lake Gen2. Microsoft didn’t stop there! Bringing the data is one thing, but data transformation is a different one! Dataflows do both of these things and they are now available for Power Apps and Dataverse!
In this article I will walk you through on what features are there for us to use and how to work with Dataflows! I want to point out that in this article I will be covering only Dataflows for Power Apps. I will not dive into Dataflows for Power BI.
As always, grab a cup of coffee, sit comfortably and let’s see how it all works.
What Dataflows are?

At first, let’s hear what Microsoft says about Dataflows:
With advanced data preparation available in Power Apps, you can create a collection of data called a dataflow, which you can then use to connect with business data from various sources, clean the data, transform it, and then load it to Microsoft Dataverse or your organization’s Azure Data Lake Gen2 storage account.
A dataflow is a collection of tables that are created and managed in environments in the Power Apps service. You can add and edit tables in your dataflow, as well as manage data refresh schedules, directly from the environment in which your dataflow was created.Microsoft
I will explain it my way but it will be I think it is very similar explanation to this one from above.
For me, Dataflows help us bring, transform and input data from many different data sources. The data can be imported into Dataverse for example. Very important thing here is that Dataflows allow us to work with data and transform it. So you don’t have to input raw data you have gotten from a source but you can transform it! This is very powerful! We will try it out in this article.
I hope you understand how important Dataflows are because instead of creating complicated integrations and data synchronizations you can create Dataflow that will bring the data for you and will do this regularly!
How to use Dataflows?
Licenses and limitations of Dataflows
At first, Dataflows require a premium license for Power Apps. You will not be able to use them if you run your Power Platform environment on a standard Microsoft 365 license. This is a premium feature.
As for Microsoft’s Azure Data Lake Storage Gen2 you need Azure subscription and Azure Data Lake Storage Gen2 account.
As Microsoft says:
If you want to create dataflows in the Microsoft Power Platform environment a Power Apps (per-user or per-app) license is required.
If you want to create analytical dataflows that store data in your organization's Azure Data Lake Storage Gen2 account, you or your administrator will need access to an Azure subscription and an Azure Data Lake Storage Gen2 account.Microsoft
As for limitations for Dataflows, there are any actually. You can create as many Dataflows as you want. The only limitation for Dataflows data would be your Dataverse capacity 🙂 So be careful with that. Remember also that Power Apps premium licenses give you additional capacity!
How to create a Dataflow?
To create Dataflow just go to make.powerapps.com on your Power Platform environment and click Dataverse on the left menu:
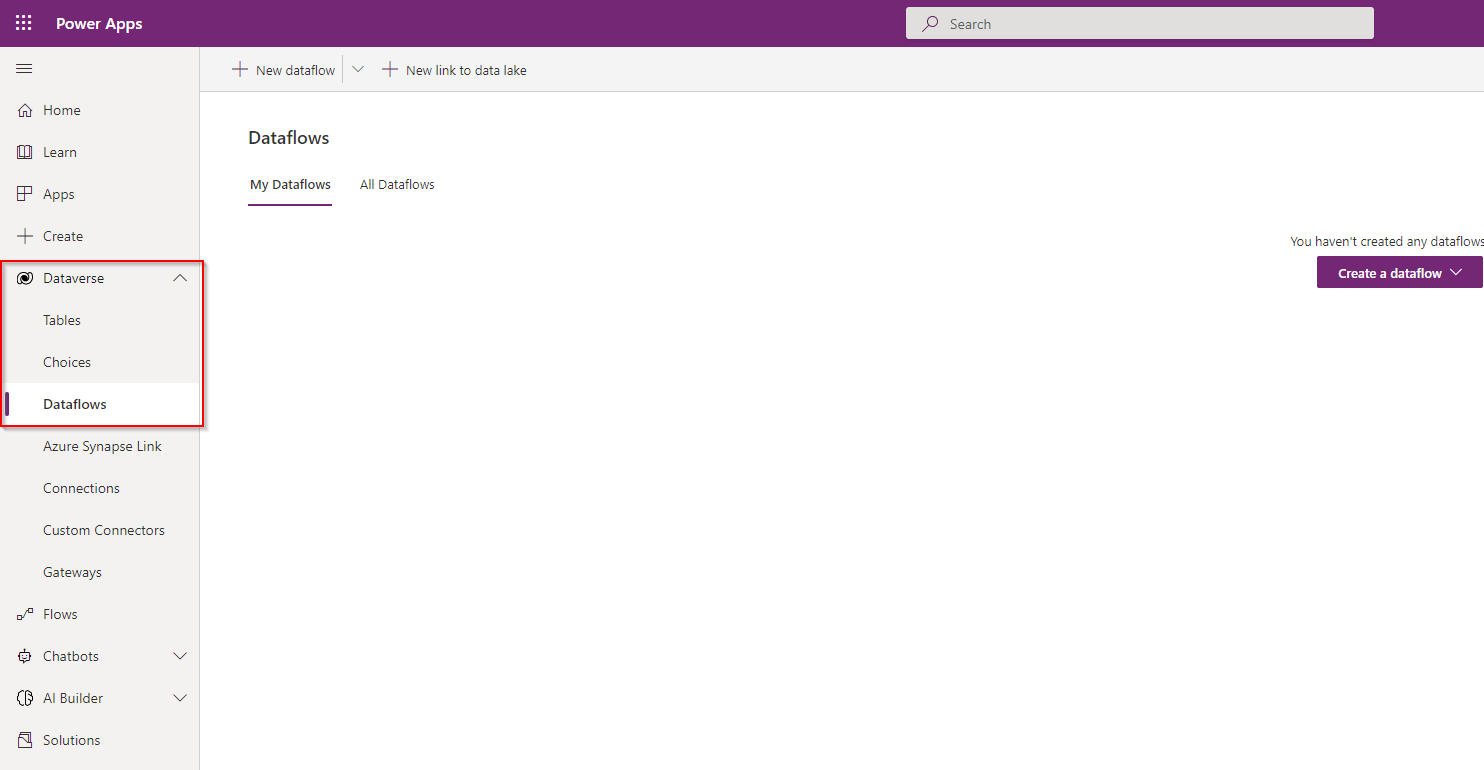
After that click “+ New dataflow” on the top or “Create a dataflow” in the middle.
Think about the purpose of your Dataflow
After you create a Dataflow you will see that you must provision information about a data source you want to use. So, in this moment you must know what is the purpose of a Dataflow and what is the source of the data. Do you want to use a database or Excel spreadsheet?
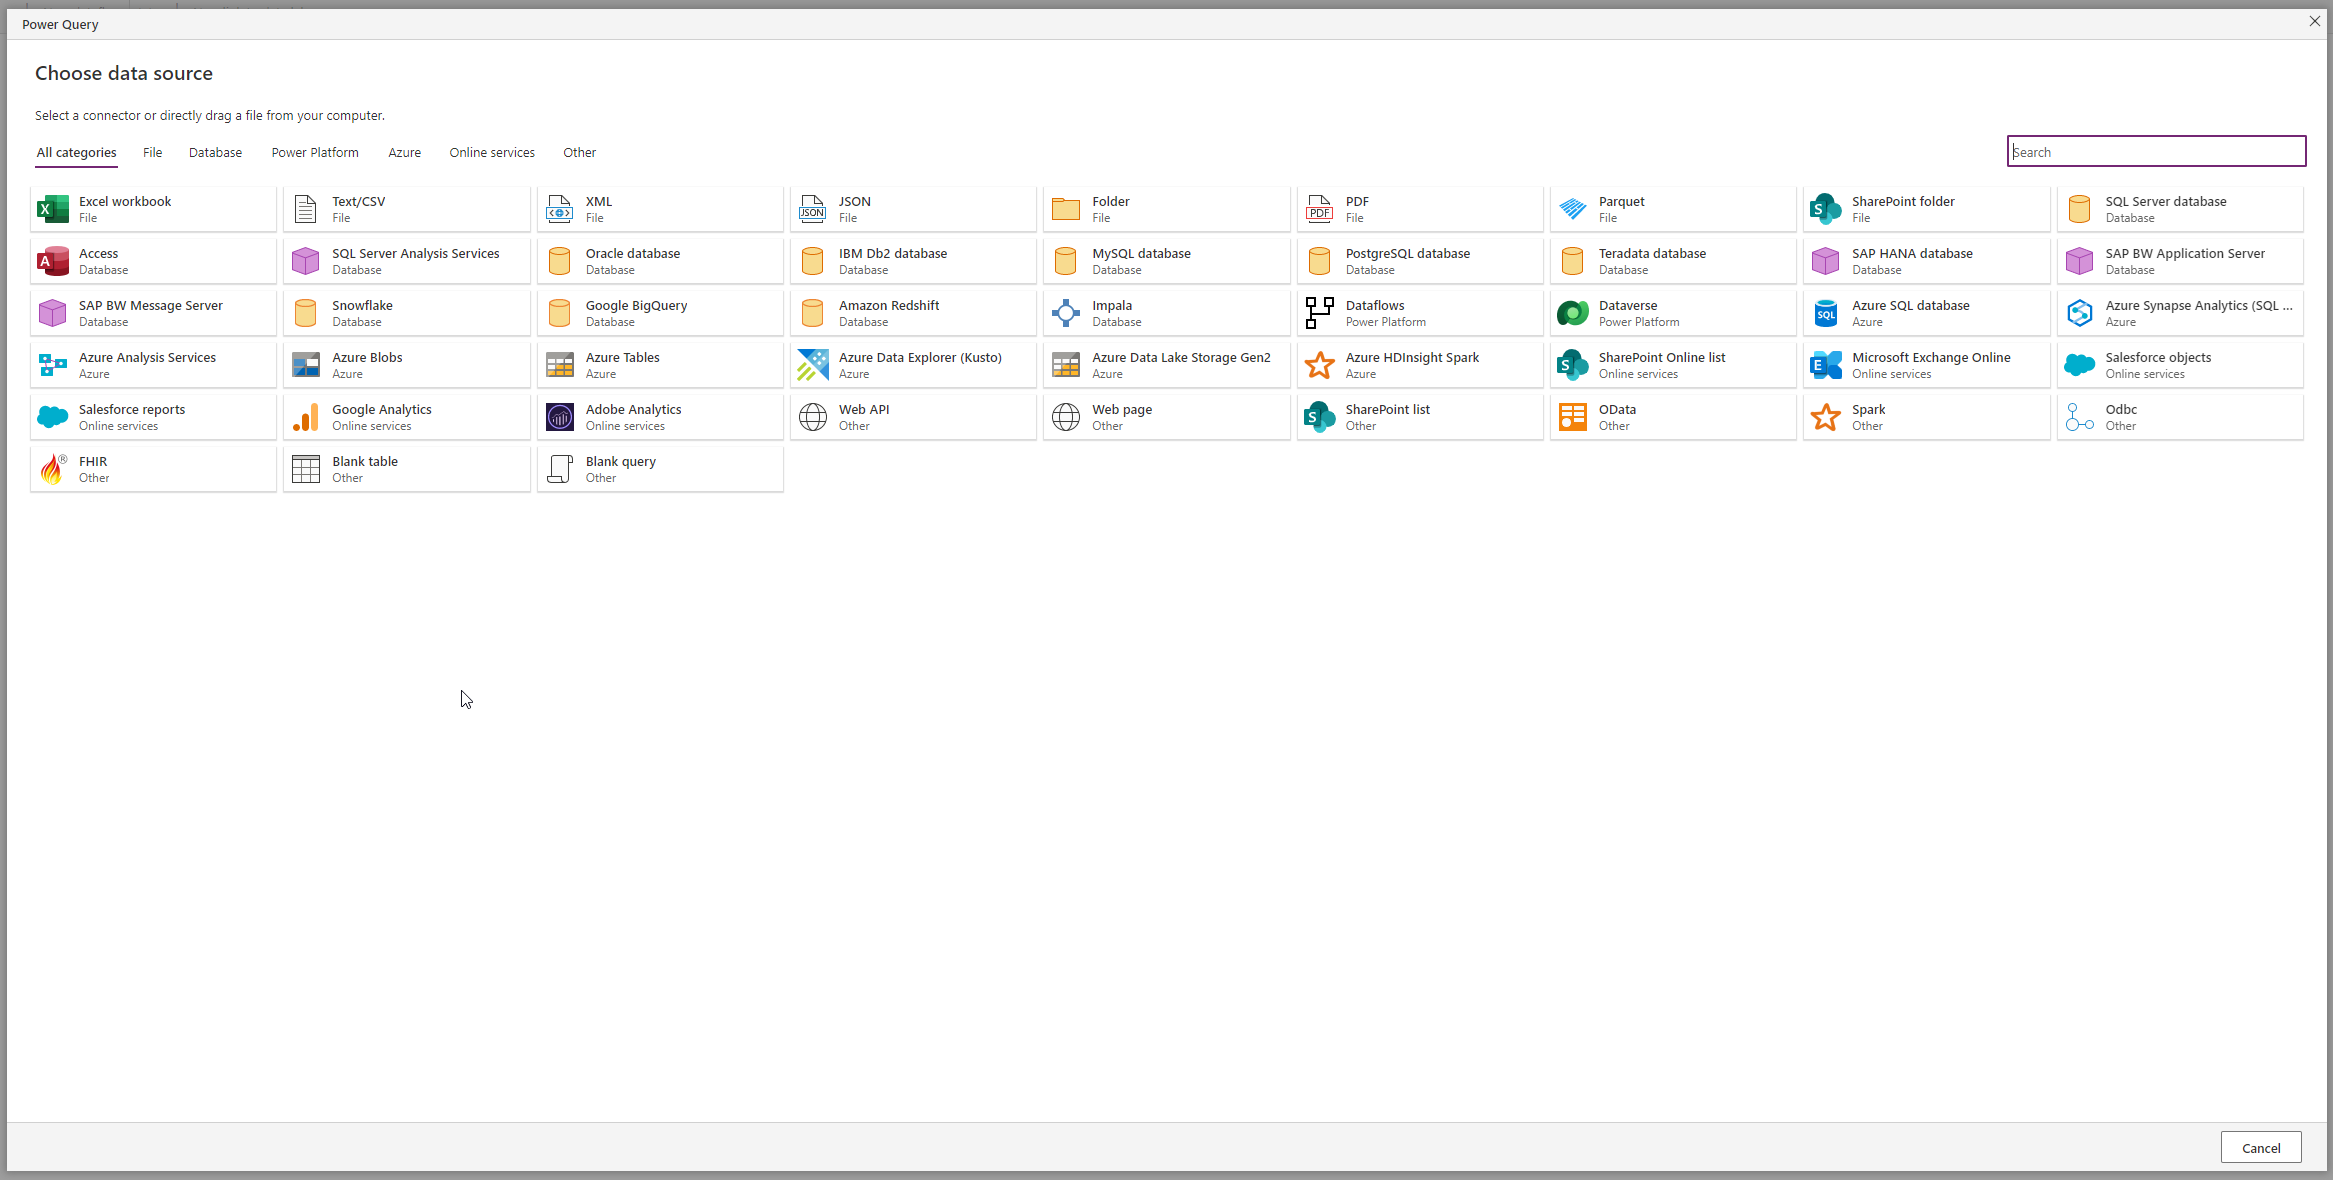
I don’t know if you can see that very clearly but I counted 48 different data sourced you can use within Dataflows! That’s mad! You can even get data from different dataflow, haha 🙂
Working with Dataflows
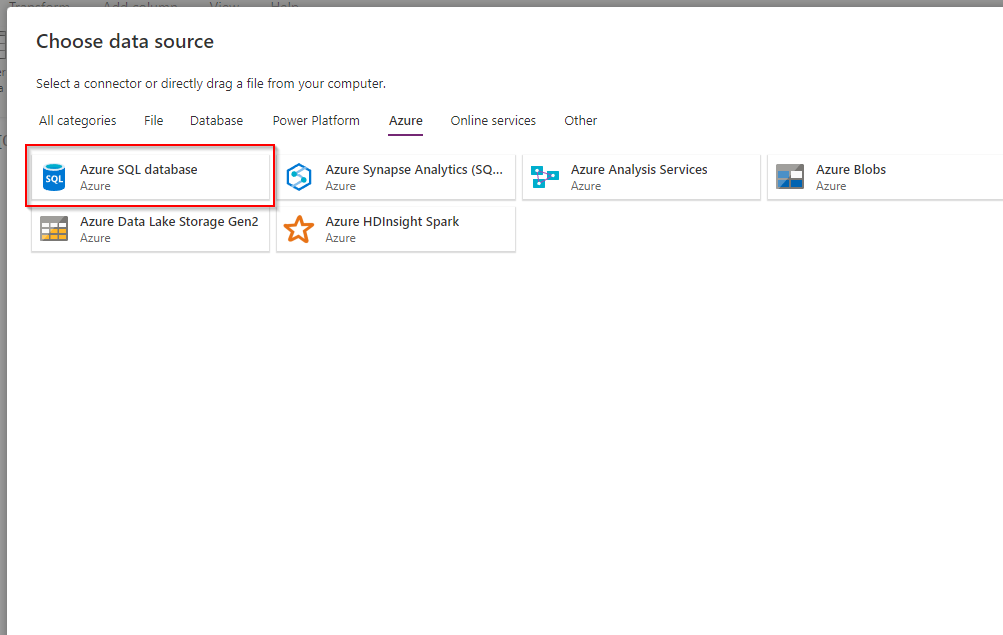
At first, after you create a Dataflow, you have to name it and choose your data source.
In my scenario I will be working with Azure SQL Database. So, I choose this option at the beginning:
Now, you must specify Connection settings for your database you will be connecting to:
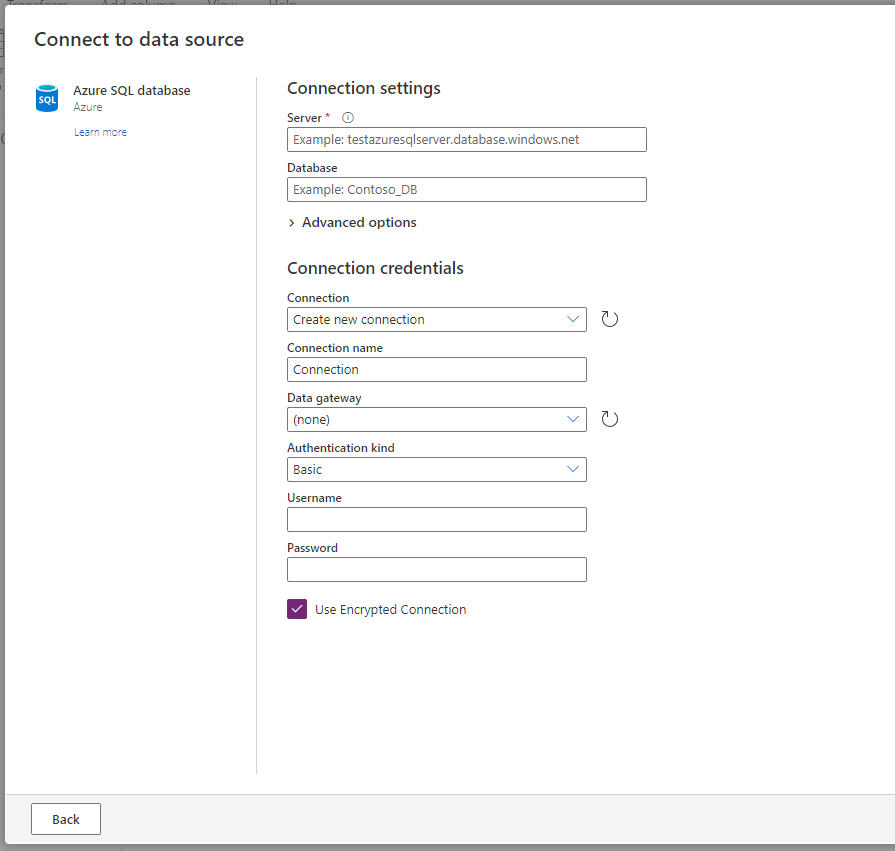
In this place you have to fill log in parameters. Remember to start from a server name because connection credentials depend on the server. In my scenario I am using Azure Database so Connection credentials are going to be created for my user.
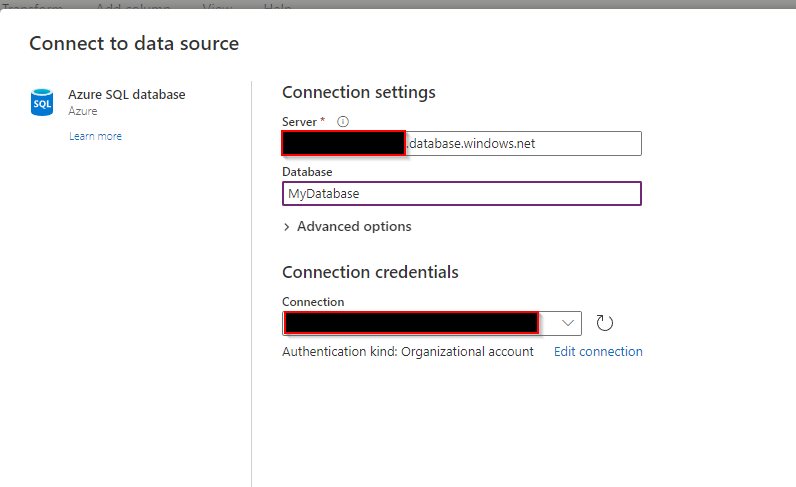
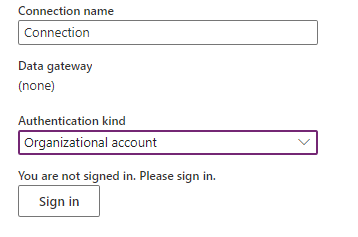
I am not gonna show a server name and connection name for obvious reasons but connection is easy to create in this scenario. If you are not logged in you will need so Sign in to your account in this step. I am showing that in the screenshot below:
Avoiding errors
Do you know what I like about this blog? That I cover problems and errors in my articles. It is very important for your work to go smoothly but we all know that problems occur (…) very often 🙂
In this case you will probably get an error if you didn’t allow your Client’s IP to access a database server. It means that you can’t log in using this Client and access data from a database.

Here I copy the problem for you for a closer look:
An exception occurred: DataSource.Error: Microsoft SQL: Cannot open server 'xxxx' requested by the login. Client with IP address 'xx.xxx.xxx.xx' is not allowed to access the server. To enable access, use the Windows Azure Management Portal or run sp_set_firewall_rule on the master database to create a firewall rule for this IP address or address range. It may take up to five minutes for this change to take effect. (Session ID: ff9b8edb-0e29-431b-92f9-2f264888cf98, Region: europe)
To resolve this issue you must go to your Azure Portal dashboard and include your IP address in a configuration of a server.
Open Azure SQL Server Networking settings and then go to Firewall rules and Add a firewall rule:
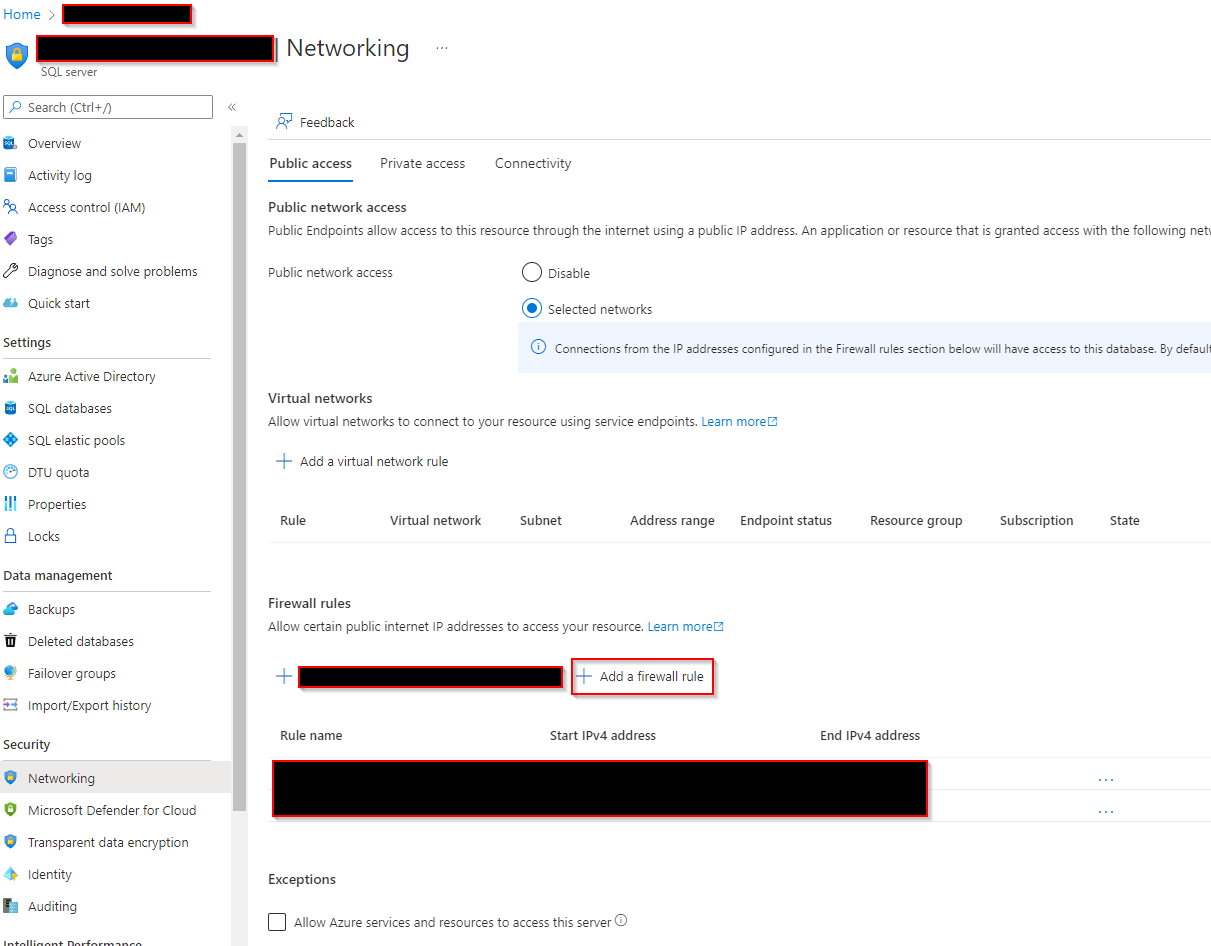
For the configuration input name of the rule and for start and end IPs include your IP from the error you are getting.
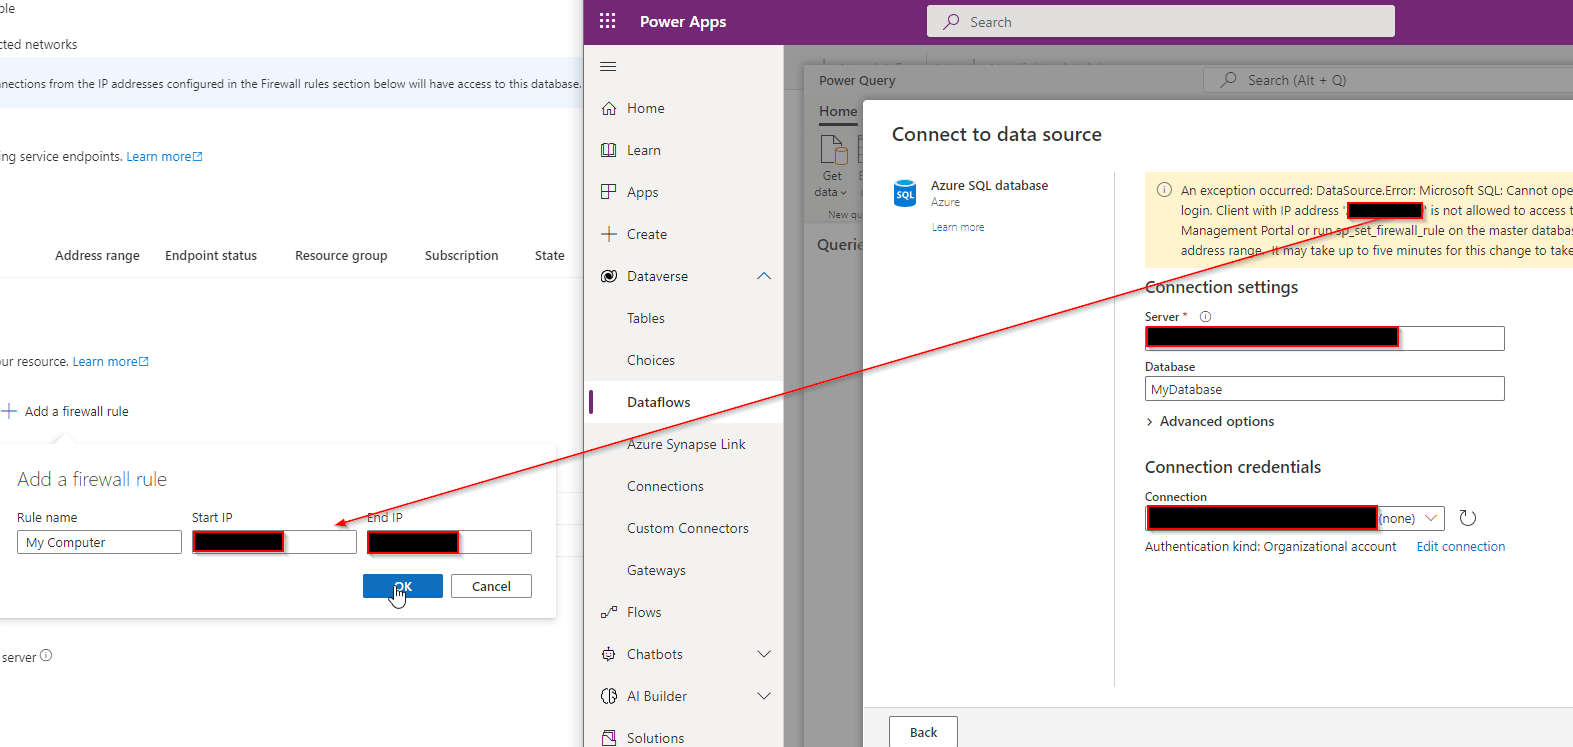
Remember, that it can take up to couple of minutes for changes to take effect. In my scenario changes were effective immediately 🙂 And I finally can start working with a database!
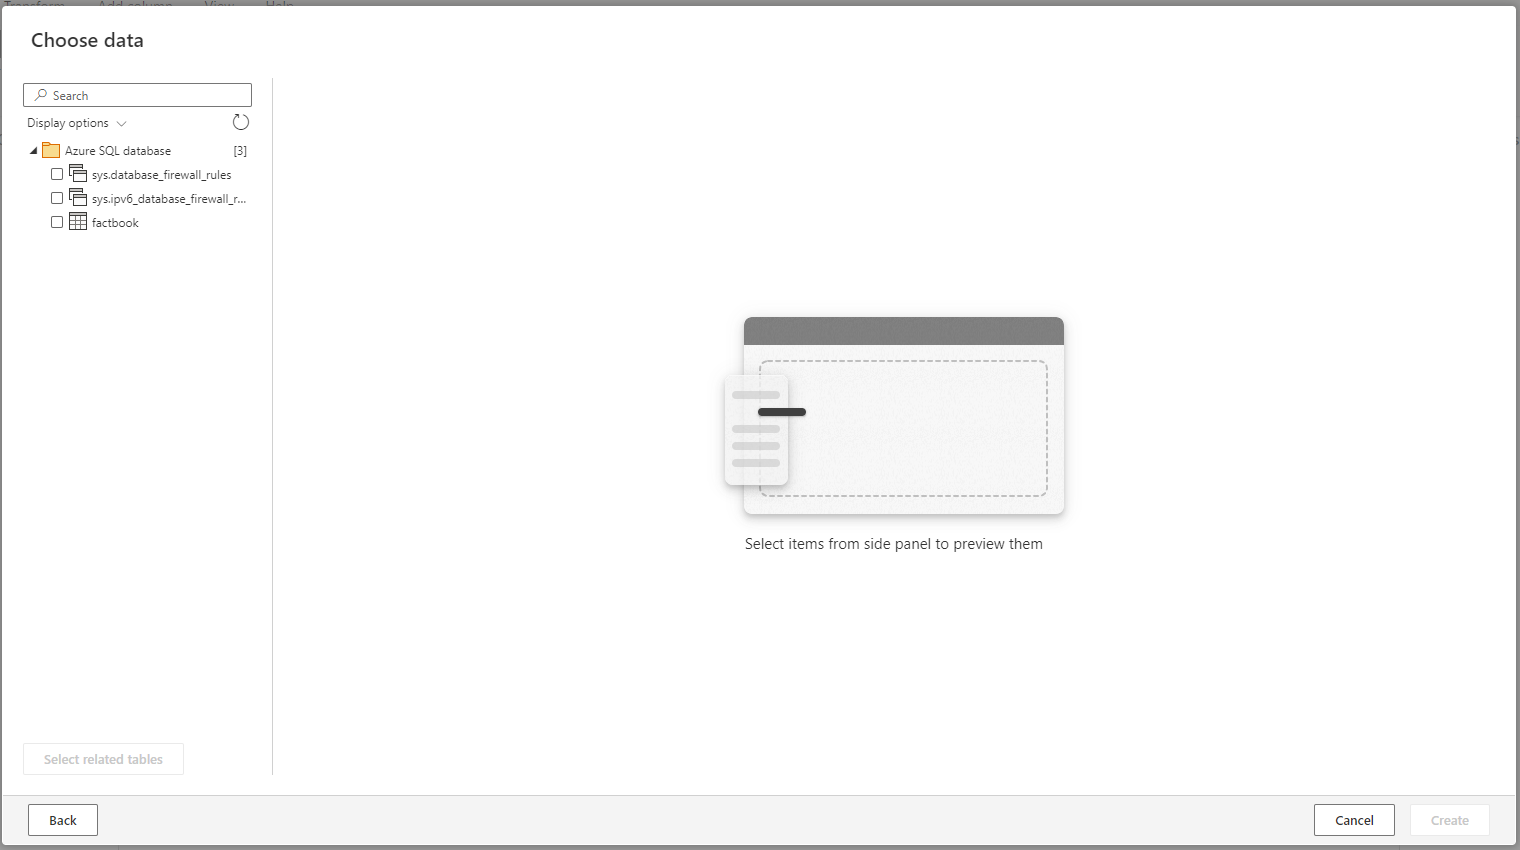
Working with data in Dataflows
For this case I imported some sample database containing information about countries. Data looks like this:
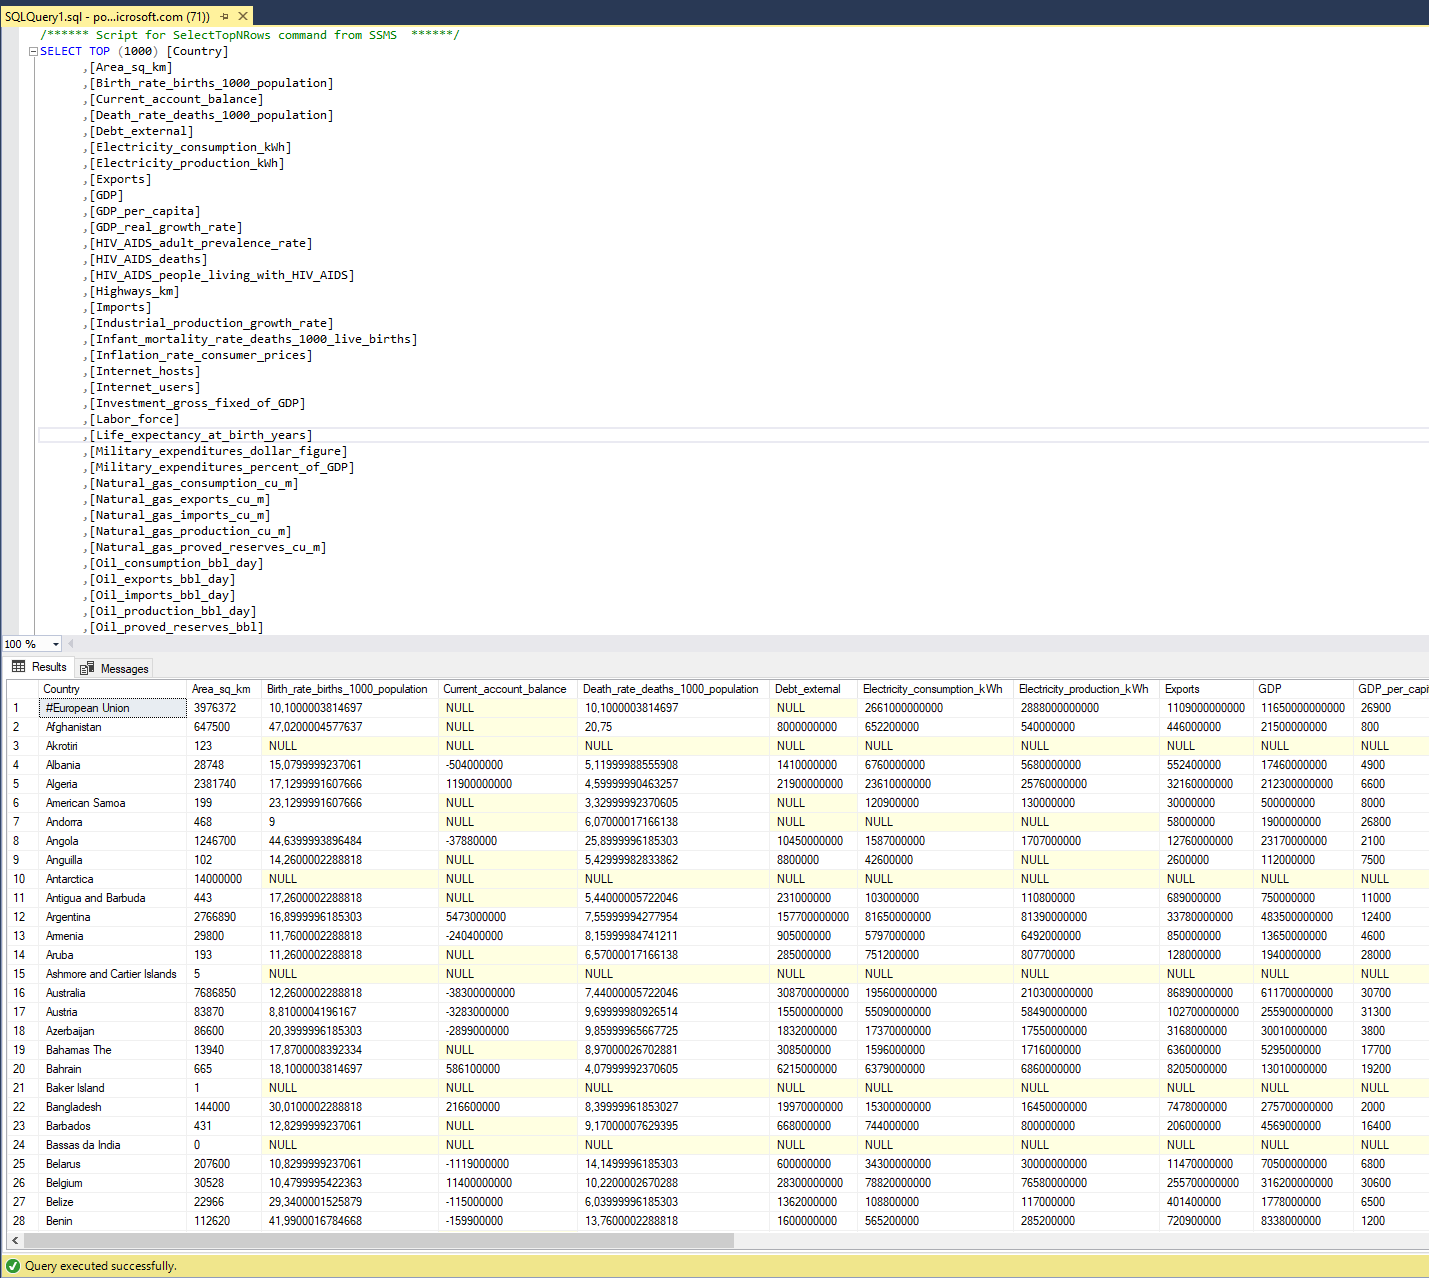
We have there information like:
- Country name
- Area
- Export
- Import
- GDP
- Highways
- natural resources and much more!
We will be trying to input all this data into Dataverse and we will make some calculations and transformation.
This is how the data looks in a Dataflow:
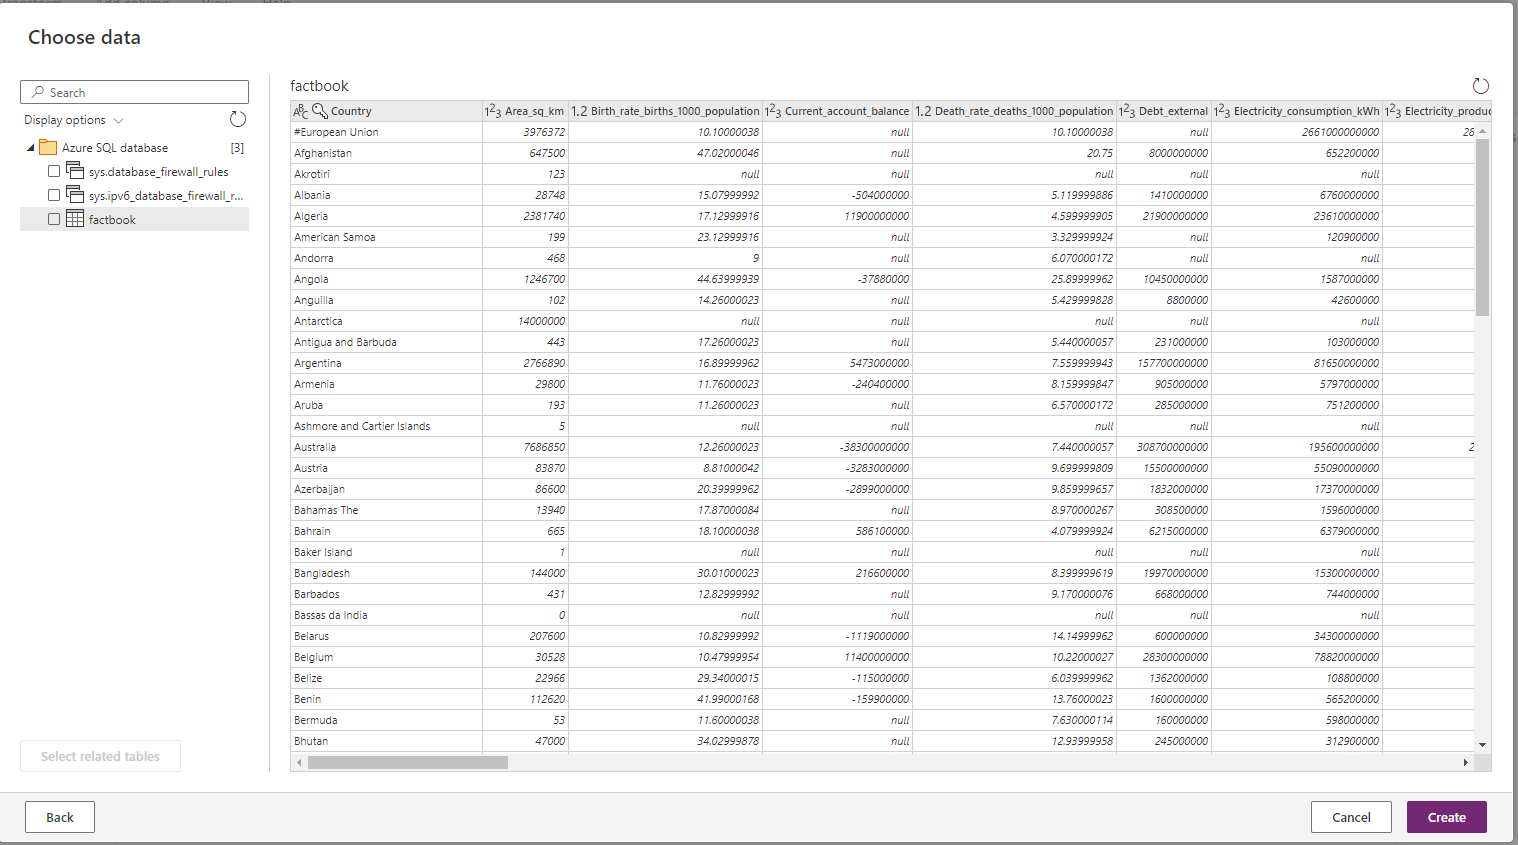
After I chose a table I click “Create” button. The data will be loaded and we can start working with it.
At first let’s check if all data types are correct. To do that we check if the type of the top of the column matches our needs:
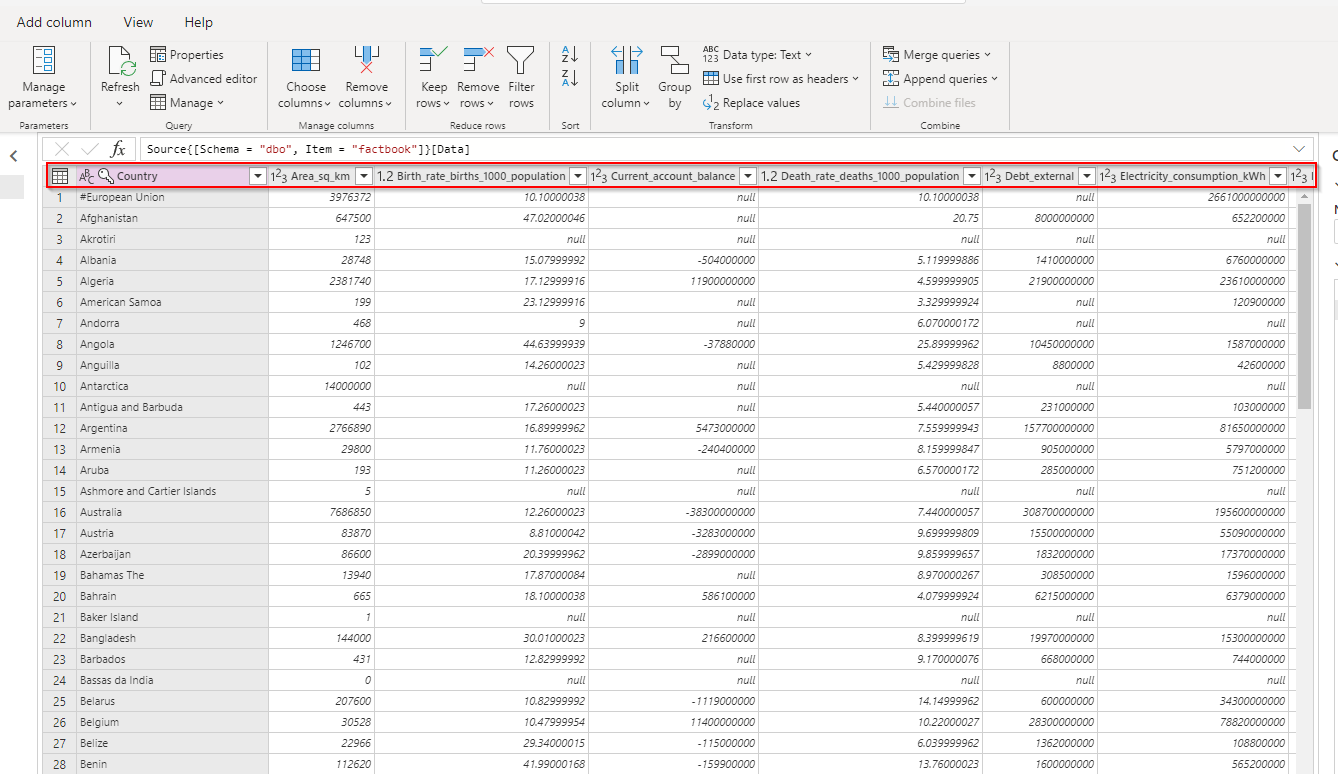
Changing data type of a column in Dataflow
For example I changed a column type “Debt_external” from int to Currency. Check it out:
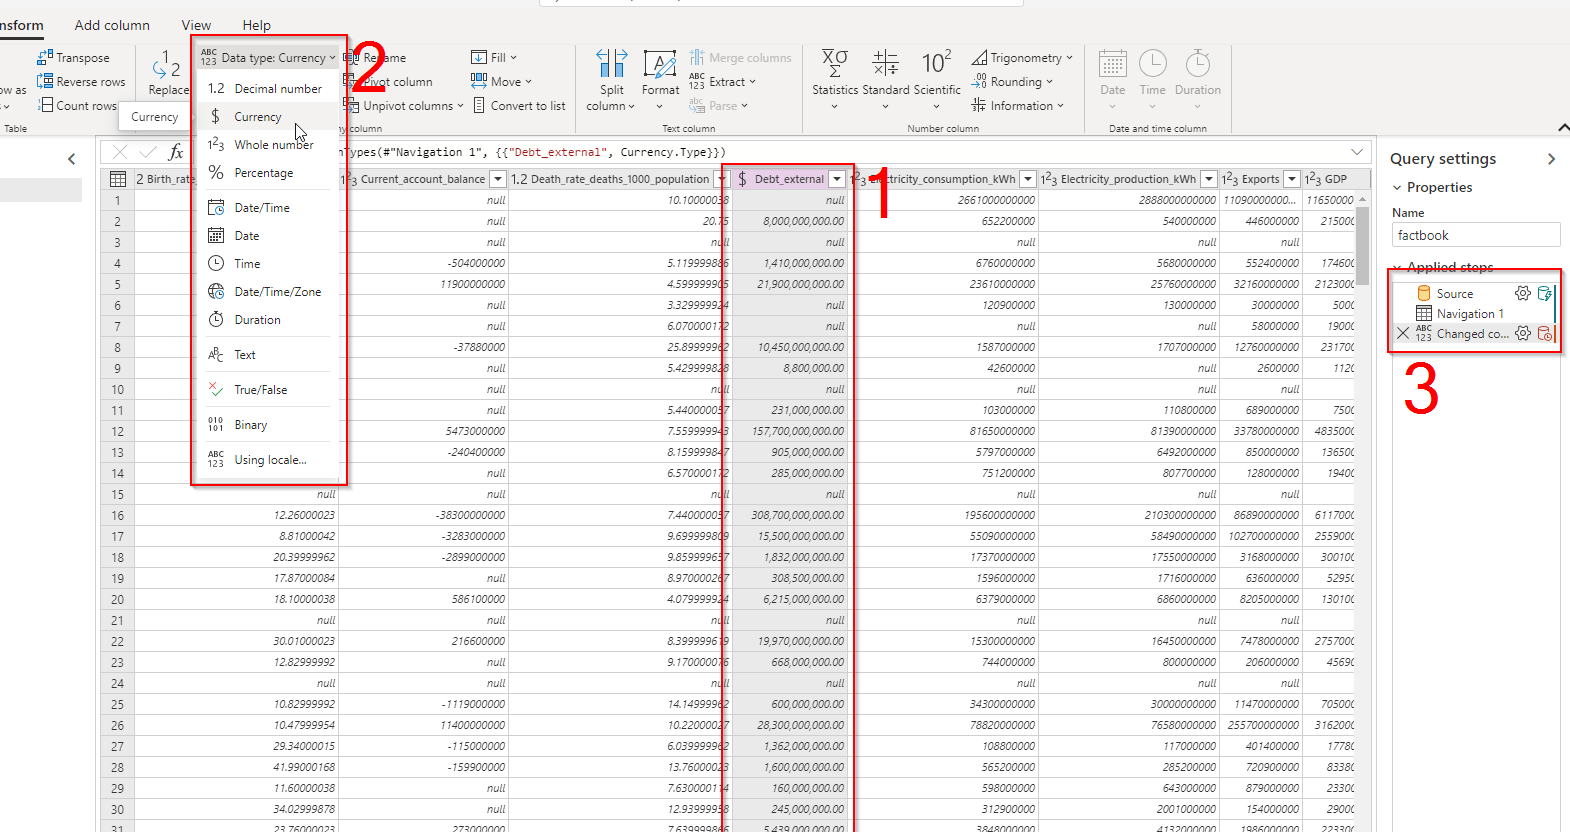
At first, I clicked on a column, then I opened “Transform” tab on the top and chose “Data type” options and finally picked “Currency” datatype. Currently applied step is now visible on the right menu. So if you want to remove this change just click “X” next to the step.
So now my data type for “Debt_external” is Currency instead of int.
What is important as well in here, you can see that function at the top is changing!
At first, we had:
Source{[Schema = "dbo", Item = "factbook"]}[Data]
Now, we have:
Table.TransformColumnTypes(#"Navigation 1", {{"Debt_external", Currency.Type}})
The formula is created automatically! That’s great. We can keep transforming columns.
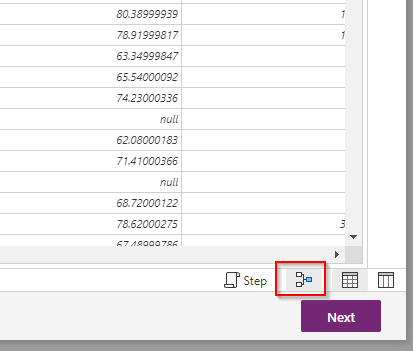
By clicking this little thing at the bottom, you can open different view of your changes history:
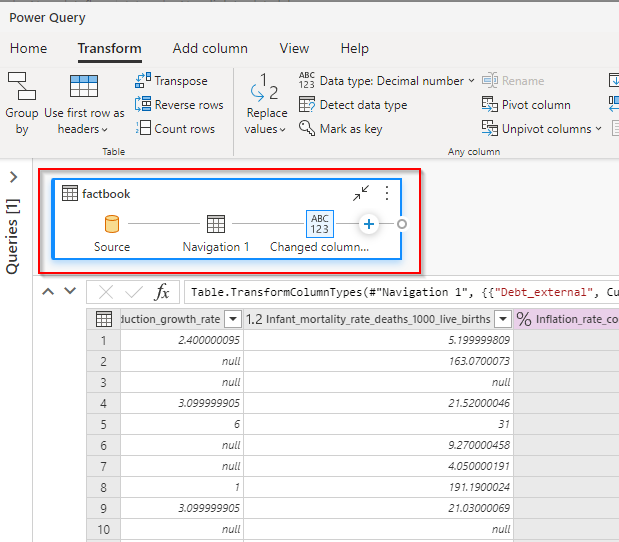
Using this view you can add steps by clicking “+” button on the right:
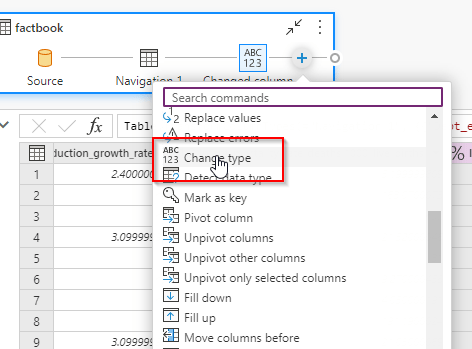
For this example I changed “Inflation_rate_consumer_prices” column as well. I changed its type from double into percentage. And it looks like this now:
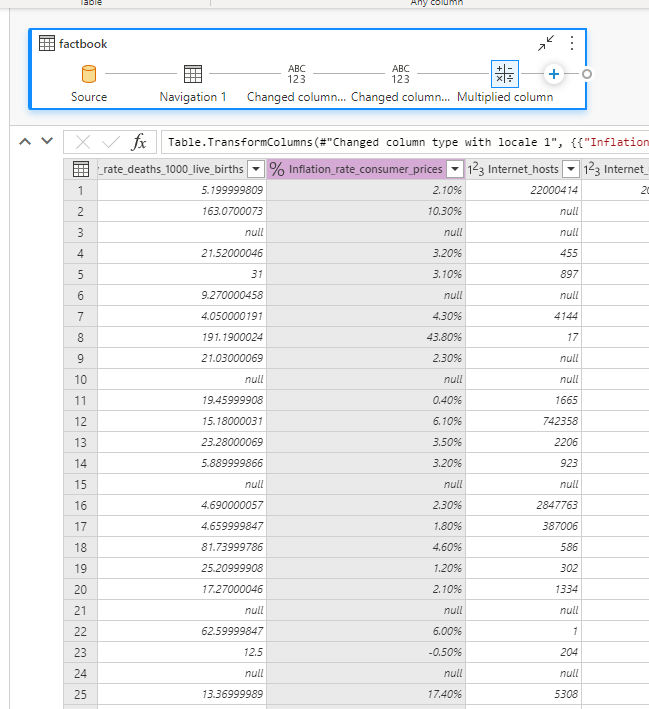
Before the change this column looked like this:
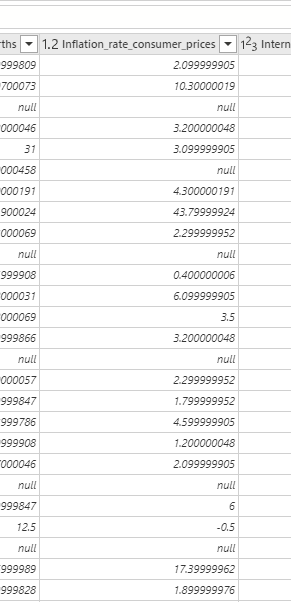
Naming columns - naming conventions
In this article I didn’t show this but please remember about proper naming conventions and give your columns correct names. More about naming conventions you can read here:
Creating custom column in Dataflow
Another example I want to show you is creating additional columns. In this example I want to check how many people is unemployed in each country. So, I took a value of a population and divided it by unemployment rate. To add a custom column you must add another step and choose “Add custom column”.
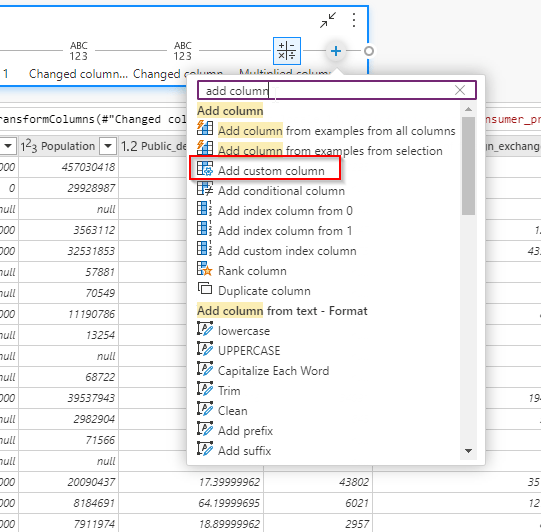
After that you will see this popup:
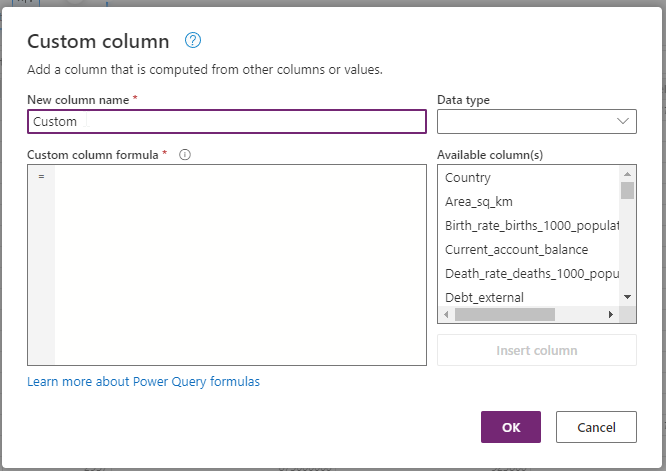
My formula looks like this:
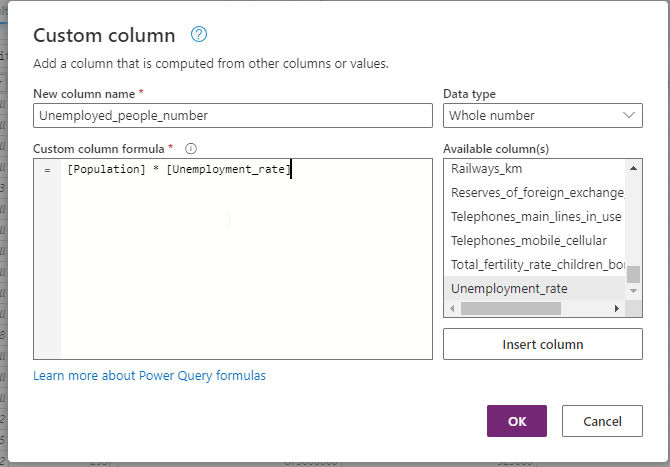
I created a column showing number of unemployed people in each country. It looks like this and it is totally new column!

I have very important note for you here. After you create custom column you cannot edit a formula in it. You can edit formula for conditional column but not for this type of a custom column.
I will show you one more example of a data transformation then I will walk you through some other examples. Unfortunately I will not show them, because there is too many options here and it wouldn’t be possible for me to show them all.
Creating conditional column in a Dataflow
In this next scenario I will be showing you how to create conditional column. I want to create a column that will indicate whether import exceeds export. So we have a flag that is showing us this information straight away.
So, I have columns Import and Export showing the amounts for each country and I click “+” on the top, then I look for conditional column and start working with a query:
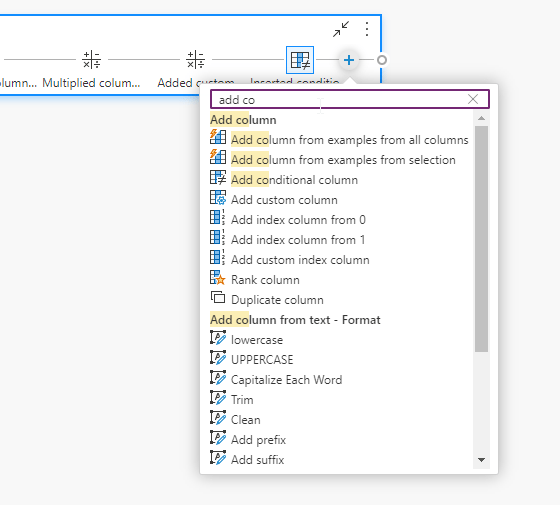
My formula for this example looks like this:
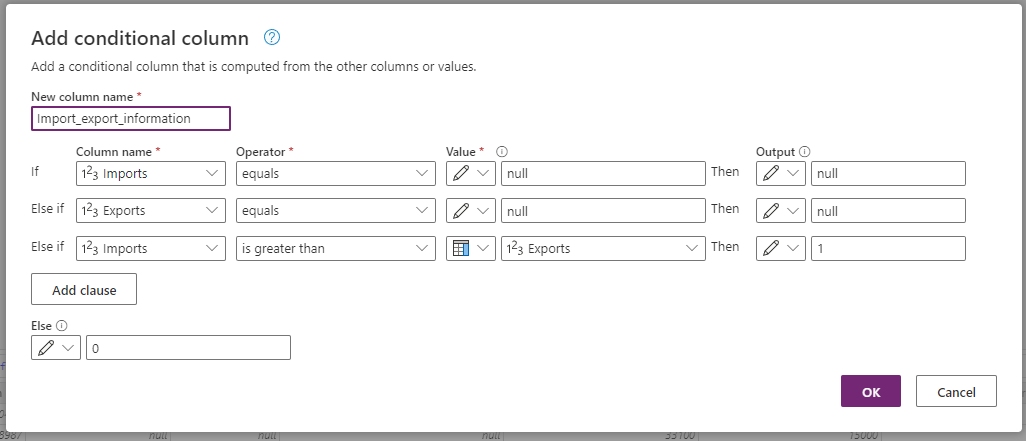
It is very simple to create such a column. You just add conditions and click OK. To check whether a column contains a null I use “null” as a Value and I check for that at the beginning. After that I put main condition at the bottom. In my opinion, Microsoft is missing here one thing. AND and OR statements. It would be great to use it here!
Finally my column looks like presented below.
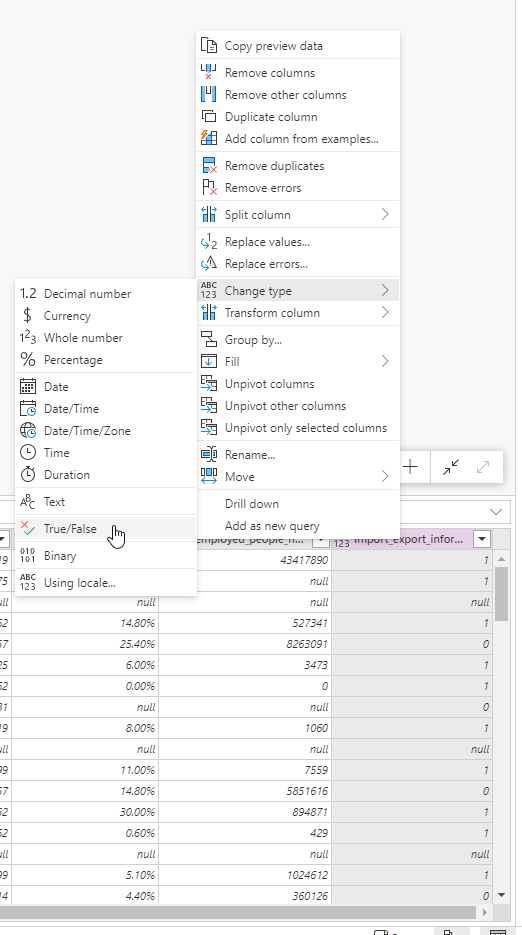
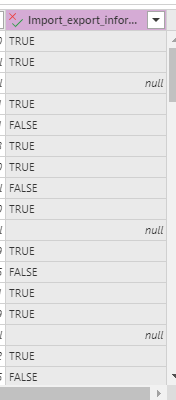
Now, I just want to change its type to TRUE/FALSE data type (boolean). So, finally, the data in this column looks like this:
More examples for Dataflows
As I before previously there are many many things you can do in Dataflows. I will not describe them all here but I will list them here so you can check how powerful this functionality is. For the Dataflows data transformation features we have things like:
- Choose column
- Remove/Add columns
- Add custom/conditional column
- Keep top/bottom/range rows
- Keep/remove duplicates
- Remove rows
- Sort table
- Merge/Append queries
- Transform any column:
- Replace values
- Change type
- Detect data type
- Mark column as key
- Rename column
- Pivot/Unpivot columns
- Fill up/down
- Move column
- Transform text column
- Split (by delimiter, number of characters, lower/upper case and more)
- Format (lower/upper case capitalize words, trim, clean and more)
- Extract (length, first/last characters, range and more)
- Statistics (count/distinct values)
What is more, you can work with many tables and columns at once and you can join them to create another tables! You can also create parameters and refresh data during data transformation.
Importing data into Dataverse

Another very important step is importing data into Dataverse. If data transformation step is finished you can click “Next” at the bottom of the screen and move to next step.
If validation is finished you should see this screen:
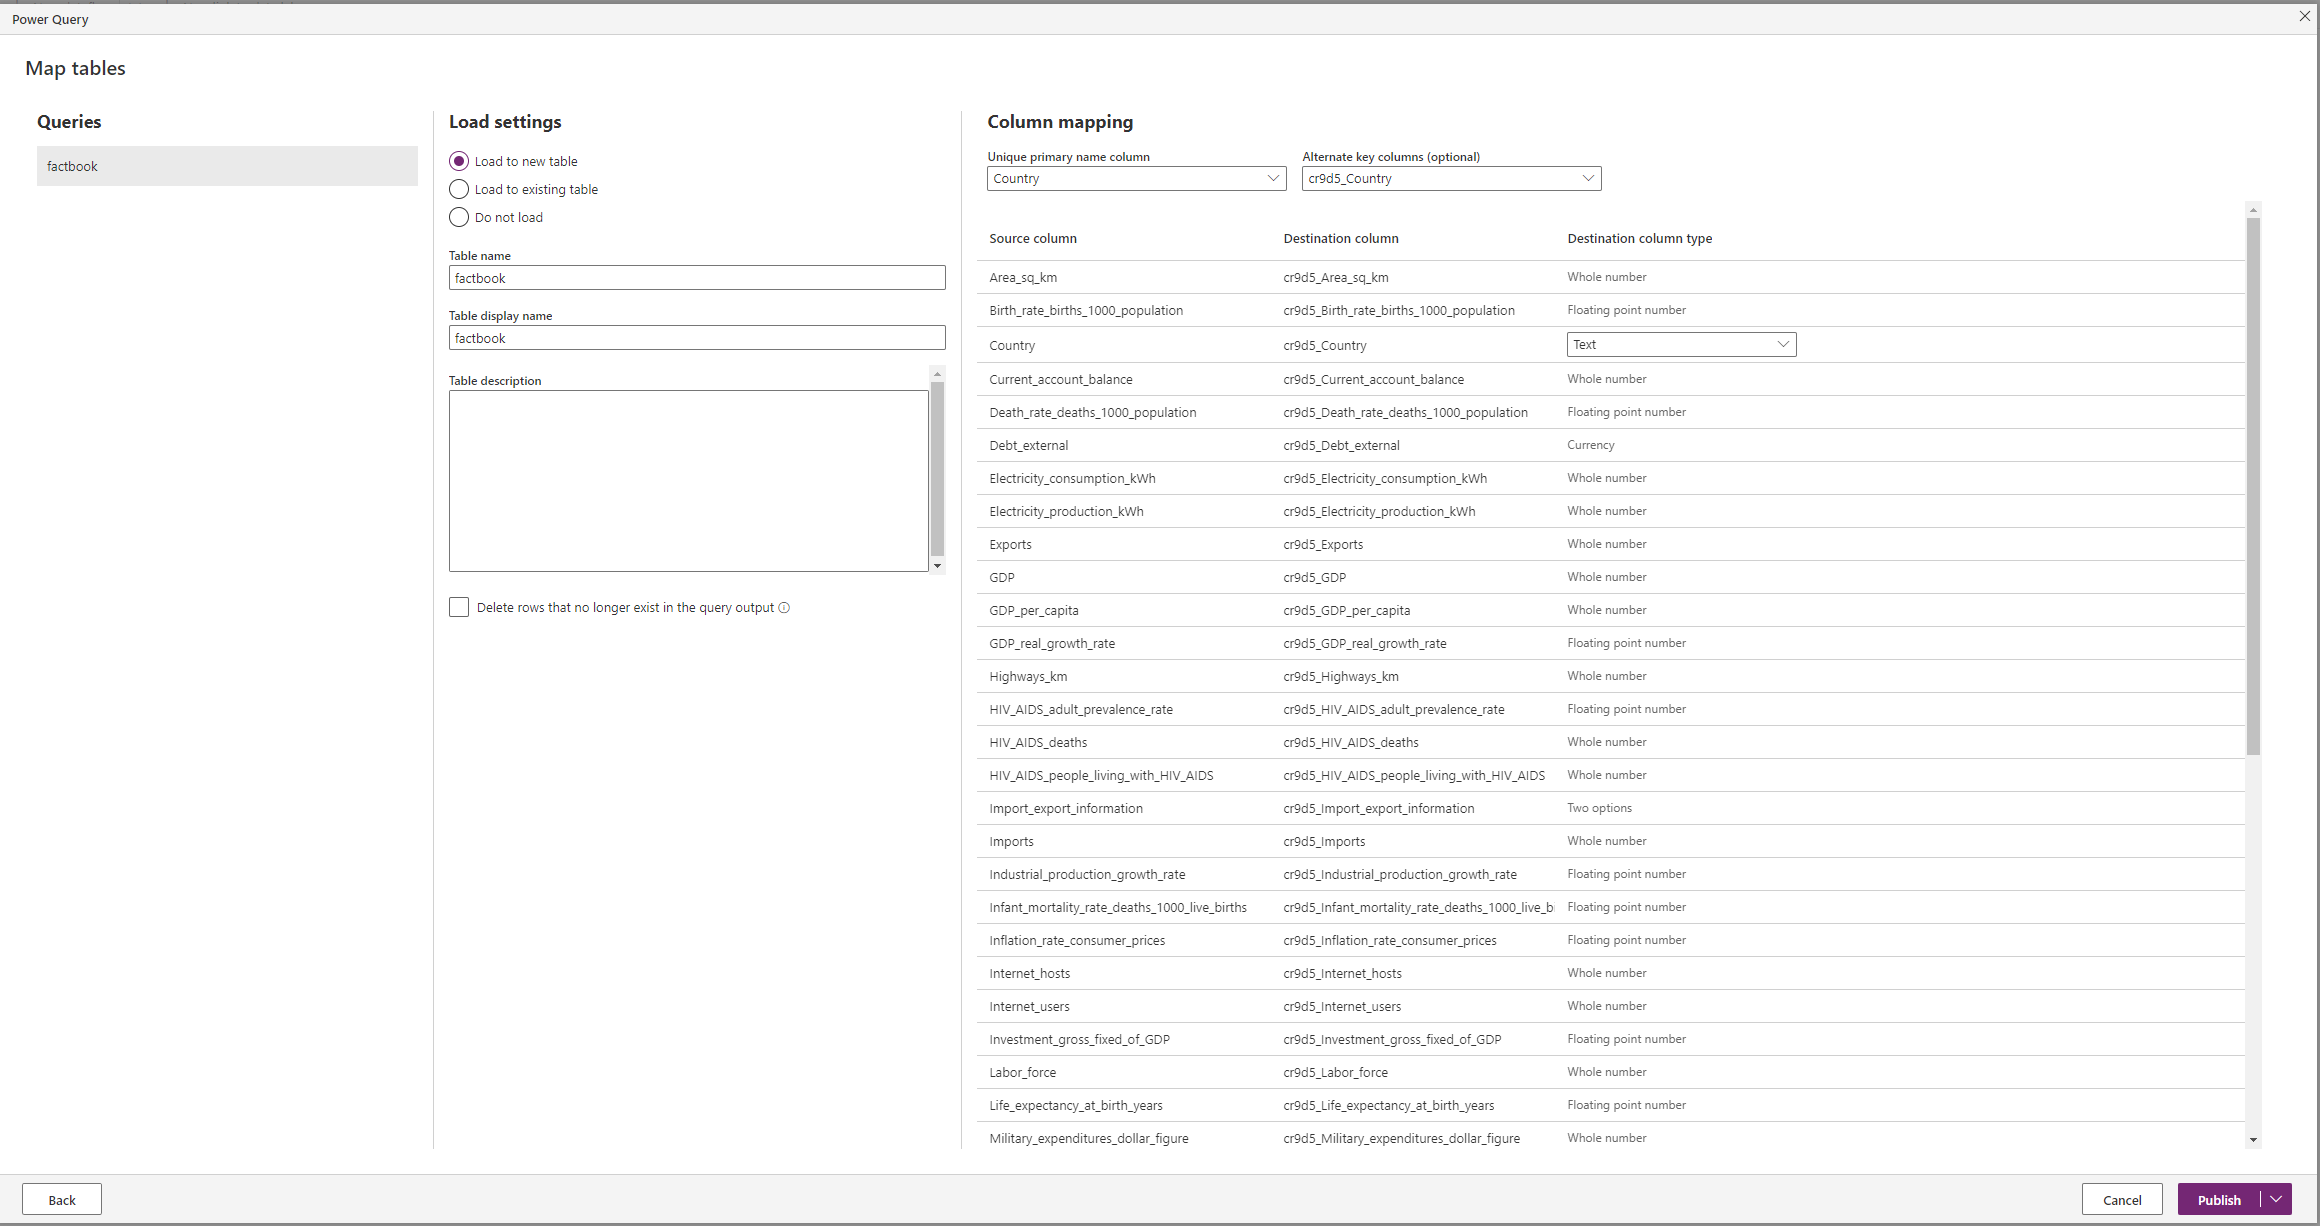
Here we have options like “Load settings” and “Column mapping”. You can choose whether you want to load data into new table or existing one. I want to create new table and input data into that table. To do that just name the table and choose which column is your unique primary column. You can also create new column:
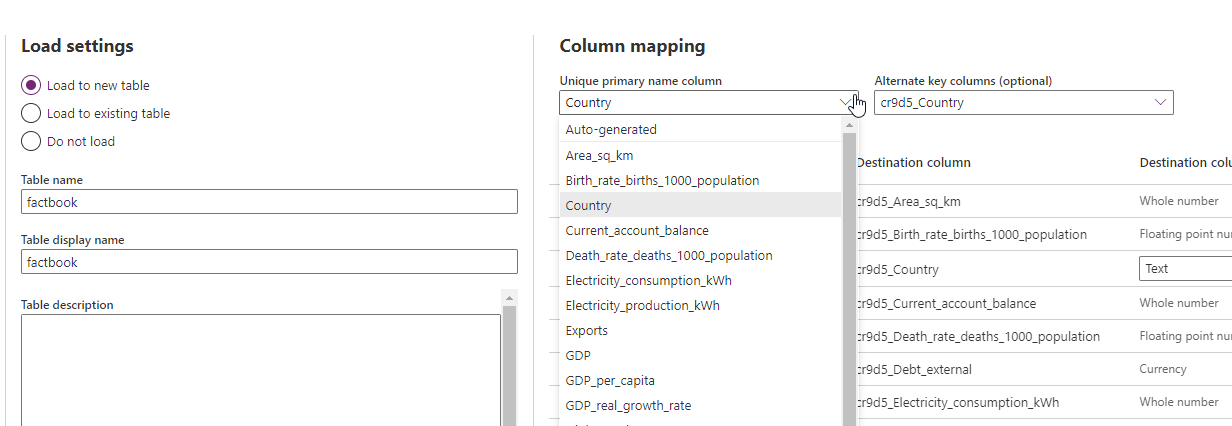
In this place, please remember about best practices for naming tables and columns in Dataverse. In my opinion it is very important. For this training purposes I didn’t focus on that topic but in real case scenario I would really change the names of each column. More about naming conventions you can read here:
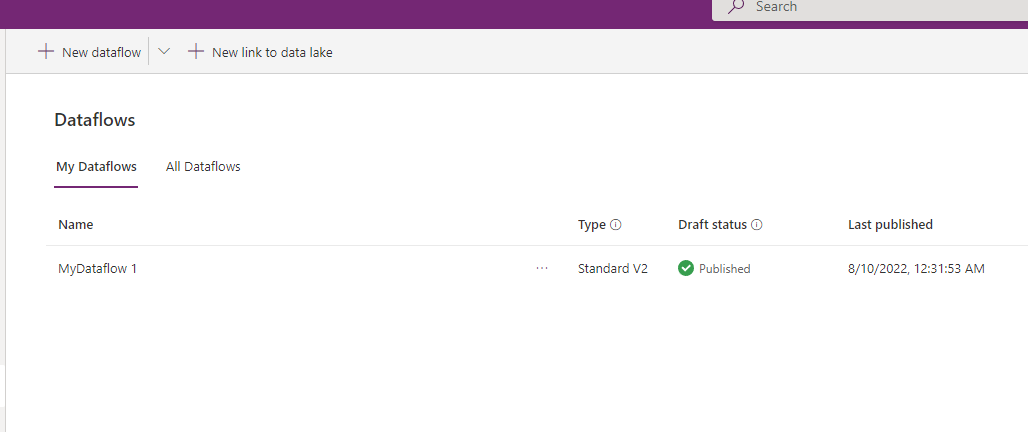
If you are ready for import you just need to click “Publish”. You should see this image:

After that the status should change to “Publish in progress”:

Now, we are waiting for our Dataflow to be ready to use! My Dataflow is ready to use! Yaaaay!
Run Dataflow and refresh
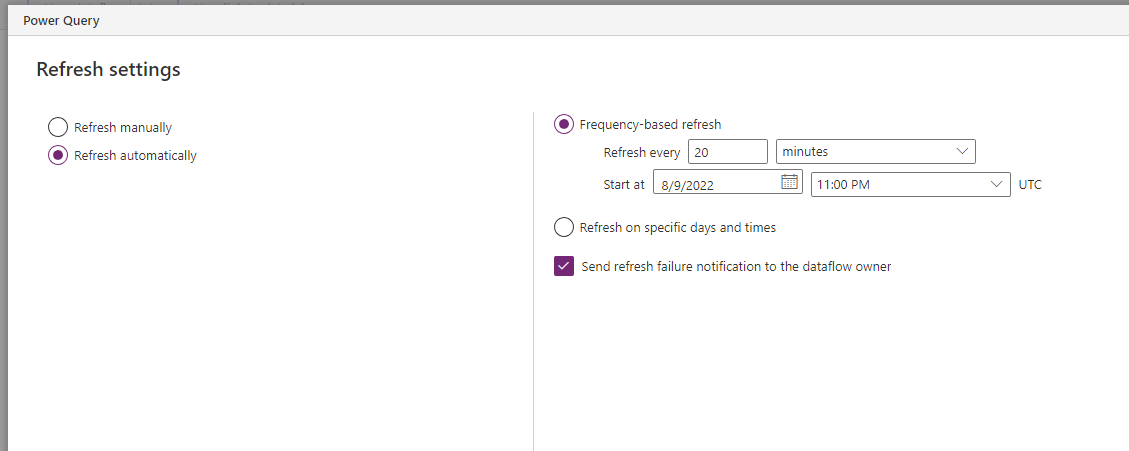
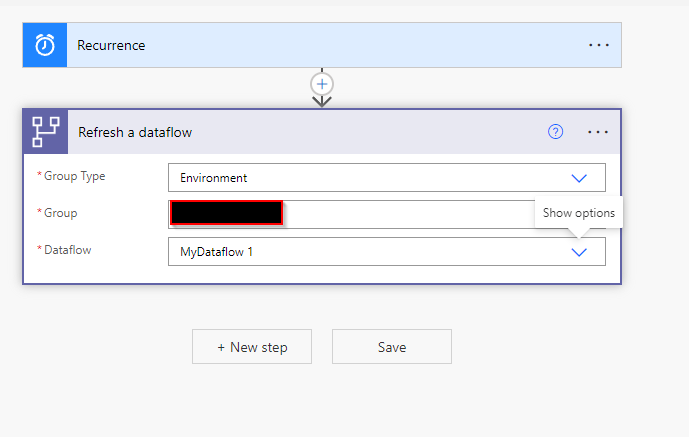
Last thing you must do is to implement Dataflow runs/refreshes. You can do that by creating Power Automate flow or adjusting Dataflow Refresh frequency.
To change Refresh frequency you must go to Dataflow setting and adjust the numbers like I did:
If you want to refresh Dataflow in Power Automate just add an action “Refresh a dataflow”. You can add this action to your Power Automate flows to refresh a Dataflow whenever you want.
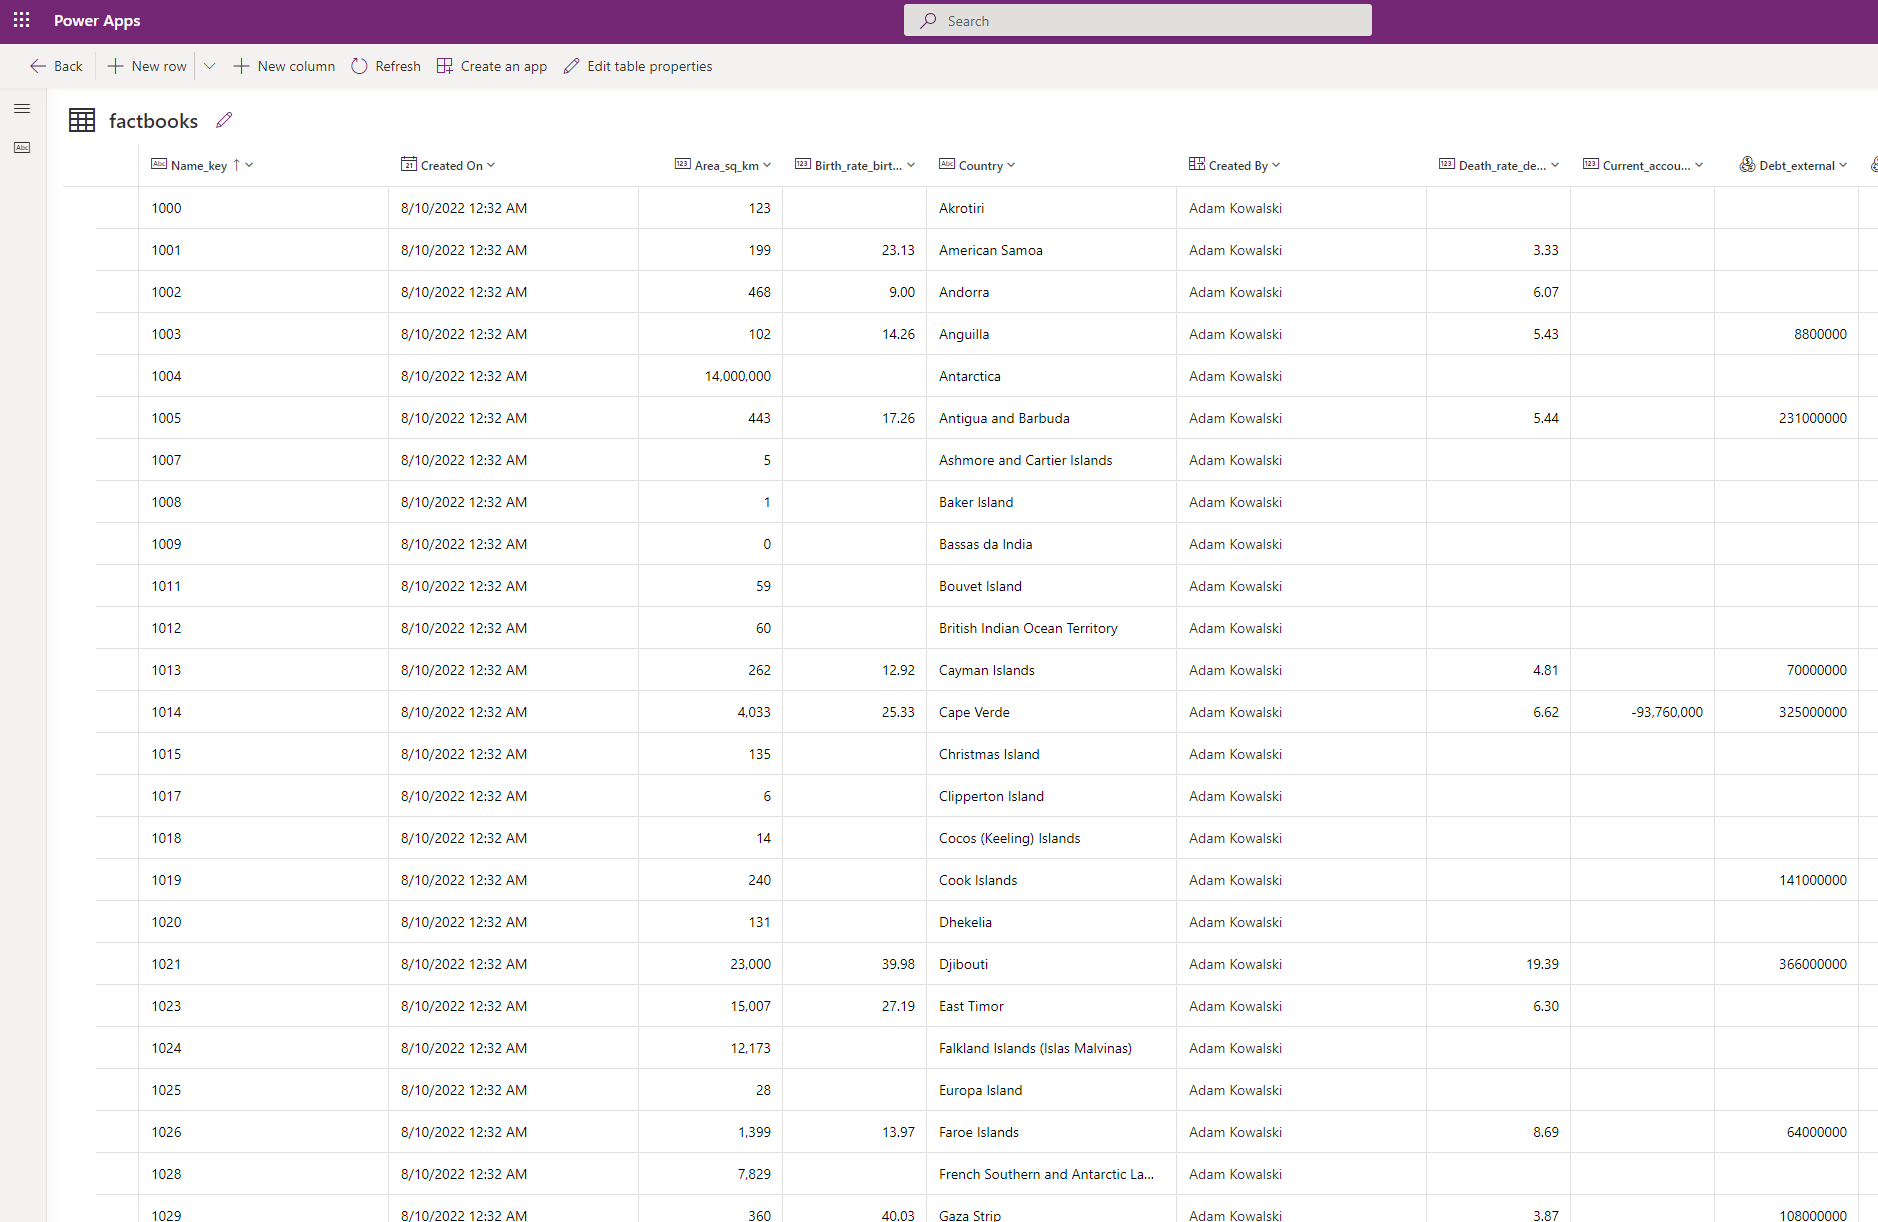
Finally, as you can see below, my data has been imported into Dataverse properly. Automatic refresh updates the data and inputs more rows if they appear in a data source.
Summary

I hope you enjoyed this article and you learned something from it. As you can see Dataflows are very powerful and finally they are ready to use in Power Apps. Instead of creating custom code applications for data integration you can use Dataflows and transfer and transform data into Power Platform. Then you can work with them in your applications and workflows.
For me it is game changer for Power Apps and I know I will be using Dataflows in the future. And you? Will you be using them? And what is more important, do you like them? Do you think they will be helpful in Power Apps? Feel free to share your thoughts in the comments below.
Thank you for your time, and for reading this article. Feel free to rate this article down here and comment if you liked it. If you have any questions feel free to contact me (via contact@poweruniverse.org), but first, you may be interested in joining a Newsletter? Hmm? (Sign up here) If you already did, woow, thanks, thanks a lot 
Via Newsletter I am sharing with you insights of my work, plans for upcoming weeks and knowledge about Power Platform Universe and IT world 
See ya!

Daniel Ciećkiewicz
I am a Senior Power Platform Consultant focused on Power Apps and Power Automate. I also worked as a Team Leader with responsibilities for every Team Member and their development paths.
In my private life I like video games, sport, gaining knowledge and a taste of good Scotch Whisky!
Oh, I almost forgot, I love our Polish Tatra Mountains!
Truly breathtaking ❤